Showing posts with label wool. Show all posts

Thursday, August 24, 2017

No Better Project Ever

Directory (in case you're in a time crunch or prefer to read a chapter a day):
Conception
Pattern
Bodice and Collar
Sleeves
The ruffles!
Buttons
Skirt
Putting the two halves together
Blocking
Pics of Finished Dress and Project Stats


I can't believe I haven't written about this project. I have been so excited about it, thought of little else and worked on it a lot over the last couple months month. Oh my goodness, it has only been a month since I started it. I guess I've hardly had a chance to write about it!

I conceived this project in the spring. A bolt out of the blue as I recall. I've referred to this picture (on the right) of my sister and me before. We love it and she remembers that dress very clearly. Remembers loving to wear it. I have since learned that it was a hand-me-down from friends and was brought as a gift to them from the Netherlands. (That gives me hope it was wool and not acrylic. But it was the 70s, so who knows.)

My sister Patricia's youngest daughter is right about the age that she was in the picture. Wouldn't it be just too much to knit a replica of the dress for her daughter? I hope you hear all the angels singing that I did!

But it had to be done for this winter or she would be too old. I was a little concerned I wouldn't get it done and thought I would enlist another sister's help. Then it became a fun collaboration. Or maybe I should say it was fun to have someone in on the secret. Judy was quite clear that I would be designing and she would be following directions!

I found some yarn in the right colours (and superwash) online and ordered more than I thought I would need. Then I had to wait. Oh it was hard. But I was going to see my family in July and thought it would be best to measure my niece first. I was going to have to design the dress, or at least heavily modify a pattern, so I wanted to know what I was aiming for. Once I had the measurement, Judy and I could start knitting right away!

I originally thought of the project as a secret, but I knew Patricia would rather be in on the secret. Judy wasn't sure, but we did tell her and she was delighted. I knew she would be!

In order to persuade her daughter to let me measure her, I told her about the project as well. She was also delighted. The rest of the weekend, she was completely endearing with her little smile, coy look and question "You making Faithy's dress?"

Wendy Darling dress
I had researched a pattern to use as a base. The one on the right had an A-line skirt, basic bodice and set-in sleeves, which is what I was looking for. I would have to eliminate the lacework, modify the neckline, probably shorten the sleeves, and add the stripe pattern.

Once I had the measurements, I worked out what was the closest size of this pattern and used that as a base. With my stitch and row gauge (yes I did a gauge swatch ahead of time. I could at least get that much done while I was waiting to start!) figured out, I could plan the stripes.

The overall plan was for me to work on the bodice and Judy to work on the skirt. Since I wanted to work from the waist up and she would work from the waist down, we both started with a provisional cast on. In the end, the two pieces could be grafted together.

It looks like I don't have any progress pictures. You can just imagine me sitting on a lawn chair knitting in the sun (and shade when it got a little too hot). And you may as well imagine my extended family shaking their heads as I spend a campout knitting.

Here is the bodice when it was knit, sewn at the sides and the collar was added.
Instead of doing a turtleneck like the original, we opted for an extended crew neck with a rolled edge (as a nod to the original's turtleneck).
After a couple rows, I added decreases wherever I felt like they were needed so that the neckband would be shaped and not stand away from the body. I didn't try to line them up. Sometimes I did six in a row, sometimes four or five.

Once that was done, it was time for the sleeves. Again, no progress pictures! I knit them flat and seamed them before sewing them to the bodice.
I started with a turned hem at the wrist.
The sleeves fit into the armseye of the bodice very well:
Now that that was done, it was time to figure out the ruffles. She never said, but I think Judy was a little dubious about the ruffles, but I knew I had to have them. They are a defining element of the dress!
It took me a while (a week?) to think about how I was going to do them. Very back burner thinking, but it works for me. There are a lot of knitted ruffles that don't work, and I wanted to avoid them. I decided I had to pick up stitches at the intersection of the bodice and sleeve and work up from there.

This is the "underside" of the ruffle (toward the sleeve).
I picked up one stitch in every row along the bodice. I didn't go all the way around the sleeve but used the photo as a guide of where to start and stop.

I decided to make the actual ruffles by alternating stocking stitch and reverse stocking stitch sections and by doing a lot of increases.
I started with knit 2, purl 2. Every row after that, I increased two stitches in every stocking stitch section. (I.e. every section where I was knitting.)

It got a little crazy with the number of stitches on my needle.
I finally figured out an adaptation of magic loop and worked with only a fraction of the stitches actually on the needle at one time as I worked across the row.
I'm working the stitches on the two needles, but all of the
stitches on the right are still on the cable too. I just pulled
out some length of the cable to give me some working room.
Every time I knit all the stitches off the left needle, I slid the next bunch on and pulled the cable through the stitches on the right needle, giving some slack to work.

I also did short rows to shape the ends of the ruffle. Because of the increases, I counted sections for the short rows instead of stitches.
I figured out the short rows by using the height of the final ruffle (so I knew how many rows I had to work in) and how wide I wanted the tallest centre section (that told me how many stitches I wanted to leave unworked in the short rows).

I don't think it could have turned out any better. Look at that ruffle-ly awesomeness:
Until I see Faith wearing the dress and a big smile, this is definitely my favourite part!

Now all that left for my part was the buttons!

I couldn't find three in my brown button jar that were the same, but I didn't let that bother me. I used a pair for the bottom and finished with a dressier one on top:
 I backed them all with tiny buttons. (Three the same this time.)
This is needed to properly anchor the buttons on the knit fabric. It also softens the feeling of a shank button (as the top one is). If you've ever made the mistake of using a shank button on your back (ahem who would ever do that?), you know that it pokes you and is very uncomfortable! With this button behind it, it doesn't poke!

Also, did you know that buttons of any size have the same spaced holes in the middle? They're all the same. That seems crazy to me, but it also makes sense. It must make manufacturing easier. It also makes it easy to sew two buttons together even when they're different sizes and separated by a layer of knit fabric. You can just go straight up and down with each pass and neatly catch the corresponding hole in each button.

Then I was ready for the skirt from Judy and she was ready to mail it. She had started it at the campout as well, but mostly so she could get past the red stripe and didn't need to bring any colour but brown with her. I didn't give her enough and ended up having to mail her more. A minor speed bump.

We also had to solve a problem with the increases. She was supposed to increase all the way down the length of the skirt. But when she was at about 2/3 of the length, she was done all the increases. We decided she couldn't just keep making the skirt wider, so she had to rip out all but about six rows!

Her row gauge was different than mine and that's what we get for not doing a swatch. She ripped it back like a trooper and increased at a slower rate. We had one long conversation where we were trying to figure out how many rows she should add between increases. She said, "Oh...I'll just go from 4 to 5." I said, no we have to do the math.

I proceeded to go through a lot of math, arrive at the wrong answer, realize my mistake, and then arrive at the right answer....which was 5 rows. I still think it was worth doing. I like to arrive at the same answer by two different methods. It's more likely to be right. And in this case it was.

Judy sent the finished skirt in the mail.
She didn't get the most exciting job knitting that expanse of brown, but she did a beautiful job.

The bottom was finished with a turned hem, just like on the sleeves.
I didn't get home until late the day the package arrived, so I had to content myself with a mock up of the dress instead of being able to join the two pieces:
I heard a report that Faith saw this on Instagram and was very excited. :)

The next day, as soon as I could, I sat down and worked on putting the two parts together.
I put the live stitches from each piece onto a skinny circular needle one half at a time. That was insurance so that I would match up the side seams on both sides. I was pleasantly and mildly surprised that we ended up with the exact number stitches on each piece. It went together beautifully!
Then it was time for a bath and light blocking.
It's superwash so it should have been fine in the machine, but there was no need for that. I soaked it in the sink, squeezed out the water, and then rolled it in a towel to get the water out. I didn't pin anything in place, but just laid it flat on the mesh. Those ruffles took a little while to dry! :)

Here are pictures of the finished dress. I'll be sure to add one of Faith wearing it when I get one, but that will be a little while. (I know--I can't wait either!)


I may do more intricate projects than this. I may do more impressive projects. More artistic projects. But right now I can't believe I'll ever do a project I'll love more. The idea, the perfect timing, the connection to the past, the collaboration, the result (assuming it fits!)...can't be beat.

Project Stats
Started
: 28 Jul '17
Finished: 20 Aug '17
Pattern: Personal pattern with a lot of help from the Wendy Darling dress from Drops Designs.
Materials: Knit Picks Swish DK in 24632 Serrano (2 balls) and 24633 Bark (5 balls) and a bit of unknown white from stash.
Co-creator: Sister Judy


As promised, here is the picture of Faith in the dress:

At Christmas, the three of us could get together for a pic:

Saturday, May 13, 2017

Spinning All the Day Long

If you've been following on IG, you know I've was bit by the spinning bug. Or maybe more like an obsession.

And not the type of obsession where you do it for 30 minutes to an hour each night. No, more like once I pick it up, I can't put it down. I think last Sunday, I started after lunch and essentially didn't stop until well past bedtime. (Once I was close, I just had to finish the ball.) So maybe more like an addiction.

What I am working on is some fiber I started a year or two ago-Malabrigo Nube (colour Azules).
I had two singles already spun from some.
I had some plan for spinning a three-ply yarn, but it just wasn't coming together. (I had never found the third colour to use.) Anyway, I decided to just carry on and make two-ply yarn from the singles.

So that's what I did with my redneck "bobbins" and "lazy kate".
In not too long (you know it was finished the same day it was started!), I had this two-ply yarn:
Spinning singles is fun and all, but plying is super fun. It's fast, requires a lot less work, and you get to see the final yarn! (It's also really fun to watch the interplay of the colours on the two singles coming together.)

I didn't measure but something in the process made me note that I think it's about 250 yds. It's a little too loosely plied and there is a chance I may hit it again and fix that.

Once that was done, I turned my attention to the sister yarn in colour Lavanda.
I had half of it already spun.
I ended up splitting the second half of the fiber into two hanks because it was too much for my spindle to do all at once, and at the end I had three hanks of singles:
They measured 252m (275yd), 184m (201yd) and 124m (135yd).

I think you can see the colour difference between the middle (larger) hank and the ones on the outside. I believe I split the original roving in half lengthwise, which normally would make the two halves match, but apparently one side had more colour than the other! (Or something about how I spun them - two years apart - changed how the colour played out.)

I set about plying them together (combining the two different colour tones) and ended up with these two squishy hanks:
They looked like a matched pair (which is good) and I think I got a much better twist on the two-ply this time. (This is what encourages me to take a second run at the Azules.)
The yardage of these two hanks is 162m and 116m, 278m (304yd) total.

Maybe because I was still stuck on the three-ply yarn, but I kept thinking that I needed a third partner for these two yarns. Maybe if I were in stores more often, I would have purchased more (roving was hard to resist even when I wasn't spinning) but then I remembered this yarn:
It's the same fiber as above in the colour Archangel.
I spun it back in 2014. It was definitely a beginner project. I still really like the colours and I like the yarn, but I just don't knit with bulky yarns that much. And certainly not inconsistent almost thick and thin bulky yarns. I like them, (they're really pretty), but I've realized I don't really like to work with them.

This would have made an interesting cowl (I think there was enough yardage) but I didn't need another short bulky cowl. So it sat in a box until this week, when I pulled it out, untwisted the plies and then respun the singles to match the other two yarns:
Or I'm working on it anyway. I have the first half done and a good start on the second half. Then I'll ply them together and then I'll be ready to find a project for these yarns.

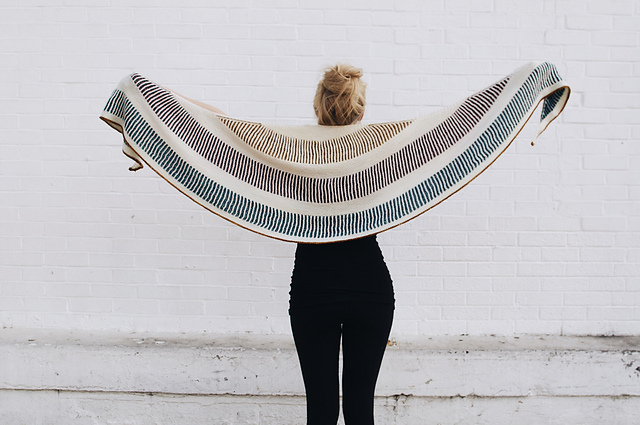
I saw this shawl pattern recently:
Briochealicious by Andrea Mowry
It uses three colours with a constant colour running through. (the striped sections are brioche stitch). It looks lovely to me but I'm not sure it's the exact thing I want. (And I'm not sure I have enough yardage.) But I'm thinking something along these lines. (Because I don't need another short bulky cowl, but I don't have enough big-ass shawls, right?!)

I went through my stash recently (looking for that Archangel yarn, now that I think about it) and I found a good amount of a light "natural"-coloured wool/silk mix that may do. Once I get this last yarn finished, I see some swatching in my future. I'm looking forward to finding out how these yarns will knit up.

Thursday, April 16, 2009

I've Found a Pattern (Maybe)


I do believe I've found a pattern for my gorgeous orange/purple/green wool from Estonia. (This has been weighing quite heavy on my mind!)


Spending hours (ok, really minutes...spread out over hours) poring over patterns in Ravelry led to this beauty,
the Pencil Sketch Camisole, from Iris G Knits. (She designed this after only about a year of knitting--amazing!)

Besides being lovely, it looks like it would only use about half of my yardage so I could have enough left over to make something else. Maybe some matching armwarmers...mmmm...tempting. But then I would have the difficulty of getting them to match. Perhaps some seaming would be in order.

Anyway, for now, I can think about the dreamy possibilities of knitting the lovely Pencil Sketch Camisole. Nothing else will do or even comes close. Even though I can't wait to cast on, something is holding me back...

When I got home and tried to download the pattern, it seems to no longer be available at the hosting site and comments on the pattern in Ravelry indicate that the designer had not updated her blog in months and months. Oh this was very discouraging!

But further research led to evidence that the designer was back on her blog and someone had already left a comment about the failed download link. I had also pursued getting the pattern from someone on Ravelry so I hold some hope that I can still obtain it.

But it is not yet a sure thing. And that would be a shame.


Tuesday, March 31, 2009

Starting Again (and Again) (and Sometimes Again)

Spring...have you read enough blog posts about spring yet? Well, the crocuses coming out to play in my yard have put me in the mood to celebrate it. The long winter is over even as it tries to make me cower under its last dying gasp. Well, I will not cower. We've had too many sunny days lately for that.

What I will do is consider the lesson I can learn from the new life coming from the seeming dead ground. The bulbs that gave up after last year's blooming are back to try again and are making a grand show of it. If the flowers of the field can do it, perhaps I can too.

Specifically, I resurrected a project that I had abandoned (several times) but not completely rejected. There was a hoodie pattern from knitty, the Mariah, that I really liked and which presented itself just as the wool for it appeared as a gift.

First the wool. My co-worker, knowing I had some skill with things knitted, asked me to look at a sweater her puppy had chewed. I told her to bring it in; I could say nothing for sure until I had seen it. She brought in a beautiful Gap cabled sweater in a coal black wool that had a gaping 6 inch diameter hole in the back. No, I'm afraid, I could do nothing for that!

As she balled it up to bitterly throw it into the trash, I asked if I could have it. Perhaps I could use the wool. I didn't want to seem too happy to benefit from her misfortune, but she had no objections and I took it home. My grandmother used to unravel sweaters from thrift stores when they were the colour she was looking for, and I figured I could too. And I did. I even kept a lot of the short fragments that resulted from the now discontinuous back. And I got a lot of wool.

Now for the pattern. I knit up the back and front pieces with no trouble. I knew I had less wool than the pattern called for so I really simplified the cables on the sleeves, changing the complicated design from the pattern to two simple four-stitch cables running side by side up the center of the sleeve [right]. All of these pieces are joined at the yoke and then knit as one.

I ran out of wool when the yoke was pretty much done and still had the whole hood to go. About that time, a few ladies and I took a yarn road trip to the very nice shop, Sheep's Clothing. I brought along a sample of the black wool just in case I could match it.

I couldn't. The very helpful employee, however, did identify it as 3 strands of a type of wool that they had. And they had a rainbow of colours, but not coal black. So I considered my options and bought a colour that I liked and figured I'd just add some wide stripes or have a contrasting hood. Or something.

So I split the ball into thirds, started knitting, and ran out of wool again. Of course it was ridiculous to expect the one little ball to get me very far, especially when divided into thirds, but I didn't think that far ahead. I called the shop to get some more and between their custom ordering system, new computers or something, and I suspect, some general "do it later"ness, it took more than a year to get more wool! Wow. This time I had ordered three balls and had them wind them together for me. That was a lot easier.

I finished the hood. It looked terrible. Really: awful. There was a very strange bump on the back of the hood at the base of the neck. I'm not sure what alien it was for (and I know a number thanks to Star Trek/Wars) but it didn't work for me. So I frogged it back (rip it, rip it) to the neckline and started again, revising the way I interpreted one part of the instructions which was not too clear.

Guess what? Looked terrible again. No better. The whole sweater went into a duffel bag and has emerged only once to have pictures taken when I added it to Ravelry.

Best I can figure I started the sweater in the fall of 2004. I bought the contrasting wool in the spring of '05. I bought the more contrasting wool in June 2007. I've moved, and the sweater has moved with me.

And now, this spring, I have started again. It's been on my mind since I added it to Ravelry. While linking it to the other projects made from the same pattern, I couldn't help but notice that a lot of other people had trouble with the hood directions. Most had given up on the hood and changed it to a simple fold over collar. And then one woman's assessment that the neckline was just way too large made everything click for me. I didn't have to try follow the [apparently flawed] pattern. It wasn't working for me, so try something else.

And I am. First of all I added a lot more decreases to the yoke while lengthening it, so the neckline now fits much better. There was a pause in the work while I considered how to construct a hood, but with some searching in Ravelry posts, I think I have something worked out. I'm about half way up the length of the hood and going strong. I hope that the third time really is the charm because I am getting tired of knitting this same hood!

Serendipitously, soon after restarting this project I read a blog post about the correct way to insert a zipper...that was the next looming (possible) snag in this project. How nice to have nipped the problem in the bud.

Here's to fresh starts in spring! (And wish me some luck, please.)

Sunday, March 15, 2009

Preparations for a Vest (and a Class)

I made a trip to Red Purl today. Had to get out for a bit. Had to take a drive in the glorious sunshine. Also couldn't wait a minute longer to wind the wool I bought about a week ago.

So I bought these two skeins of wool from Estonia
last week but didn't take the time to wind them at the time. Then I had to look at them at home realizing that I couldn't actually work with them because they weren't wound yet. Very frustrating!

They might look like a variegated colourway, but that's not quite true. Instead of changing colours every so many inches, one colour goes on for yards and yards before changing to the next colour. So as you knit you get wide stripes of consecutive colours.

I'm planning to use it for a patterned vest and it's going to make it look like I changed colours all the time, when really I worked from one ball and it did the work for me. (It's similar to self-striping sock yarns, although in the sock yarns the colours change much more often.) It's a great trick for making yourself look very talented while doing a simple fair isle!

I've been gloating to myself about this wool every time I've looked at it for the past week, and really couldn't wait another minute to roll it into balls, and then perhaps start my swatch. (Oh, I can't wait...)

Can you see the stripes in the ball?
How it changes from light in the center, to dark, to light, to dark, etc? This will be the "main" colour in the vest and will be used for the waist, armhole and neck ribbing. I'll have to see how I get the two arms to match...hmmm, something to consider as I go.

And then the one I really love:
Green to purple to orange a couple times. Amy has a sample knit up in this colourway and I just love it. It's going to be so fun to work with!

I think the two colours will play well together:
We'll have to see how the light and dark variations of the grey play against the more drastic colour changes of the other. Always an adventure!

And while I was at Red Purl and we had some time to talk, Amy and I picked some dates for the class I am going to teach. Oh yes! Hadn't I mentioned it? I am going to be teaching my first class at Red Purl to show you how to make a Better Plastic Bag for yourself! Look for details soon at Red Purl's website.

Maybe I'll see you there,
christina

May I suggest?

I Say! or at least I did once...