Showing posts with label handspun. Show all posts

Saturday, June 24, 2017

Tilted Pi Shawl

It's not like I've been keeping this project a secret (there have been pictures on Instagram), but sometimes I finish a project before I get a chance to write about it!

So what we have here is a story with the beginning, middle, and end all in one post. :)


When I finished spinning the three colours of Malabrigo Nube fiber I had, I started to look around for a project to use it in. I mentioned that I was looking at the Briochealicious Shawl but I was worried about having enough yarn and it didn't show off the coloured yarn enough for what I wanted with these yarns.

After looking around at a bunch of shawl patterns and evaluating what I was looking for, I decided to do my own Pi Shawl. The Pi Shawl was so named by Elizabeth Zimmermann. It actually has nothing to do with the value of Pi--the key was realizing that the diameter (or radius) of a circle is directly related to the circumference. Which means if the radius doubles, the circumference doubles.

So Elizabeth explained that if you double your stitches every time the radius doubled, you will end up with a circle with no more complicated calculations needed. This basic idea has released an explosion of designs. By doubling the stitches (easily done with a K1, YO repeat) on rows 2, 4, 8, 16, 32 etc, you were guaranteed a circular shape. For most shawls you don't get very far past row 64, so the whole shawl requires no more than six shaping rows. This is revolutionary stuff, folks!

Of course this only works because knitting is stretchy and malleable. You certainly couldn't use this shaping for something made in fabric. The most basic shawl would be stocking stitch with eyelet rows at the increase rows only. But you could do any stitch pattern in each section, as long as the gauge was the same.

For the stitch pattern, I decided to do more than the basic, but to still keep it simple--I added eyelets every six rows. This is a very simple lace design and the increase rows blend into the entire pattern.

I got started with the Archangel colourway. After one false try, I ended up doing eight eyelet sections in the first colour. That meant the first row of the neutral colour was an increase row. Since the neutral was a little thinner than the Archangel, the increase flowed very nicely.
When I was looking at patterns, I was very intrigued by the ones that used asymmetrical shaping to play with stripes. I liked the asymmetry but I wanted to end up with a regular half circle shape, so I played around with short rows:
You can see above that the first colour is symmetrical but after that the neutral and Azules (blue) stripes are wider on the right than on the left.

After that pictures was taken, I ended up ripping back a ways to adjust the width of the last two stripes. I was considering the look that I wanted, controlling the final size, and having enough yarn because the width of these stripes would determine how wide the following stripes would be. After the Azules would come the Lavanda colour and the final stripe would be over a lot more stitches. I didn't want to run out after just a few rows and have a skinny bit of colour at the end!

The second try looked better so I continued on.
You got a glance of the shawl in progress in my Squam post. It was the project I worked on the most at Squam. It was too big for the plane (where I worked on my long socks) but it was perfect for sitting around with other people--fairly simple and a pleasure to knit.

Not long after getting back, I finished the knitting. I had enough of the Lavanda to do the length of the shawl, but ran out while doing the hem that would be folded under. No problem, I thought.
I know the last stripe looks blue in this pic (and some following),
but it is the Lavanda.
I'll use some of the Archangel from the top of the shawl and it will just be a little pop of colour if the shawl edge flips up.
At the beginning, I wasn't sure how I was going to finish the shawl edge. I knew the  main concern would be to keep it from curling up. I had thought about an Icord edging all around the shawl, but when I thought about a folded picot hem, I decided it was the perfect finish to go with the eyelets in the rest of the shawl.

There weren't any clear areas in the house where I could lay out  a project for blocking, but I realized there was a corner of the office I could clear out and it worked great.
You can clearly see the asymmetry in this shot. The last stripe actually got wider than the middle stripe, but at some point I decided to just knit out the last colour because I didn't want the shawl to be too short.

Blocking was made a lot easier with my blocking wires.
The straight edges were easy with the rigid wires, but the real key was inserting the flexible wires. Since it was a folded hem, I could run the wires between the layers and easily pull out all of the picot points. Perfect!

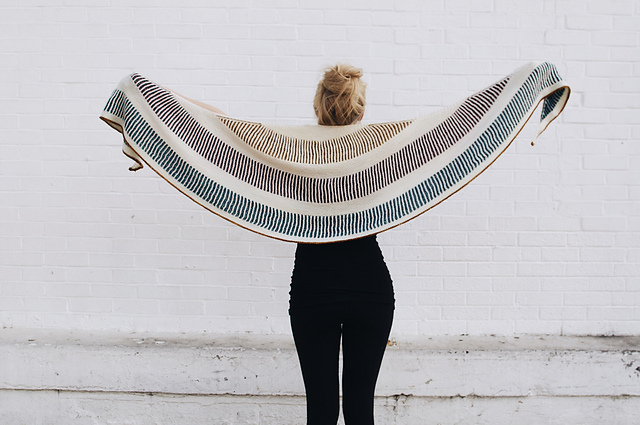
Once it was blocked, I hung it up for some beauty shots. But the wind started blowing so it seemed a video might be better.
I love how the eyelet rows make even concentric circles but the colour seems to shift on top of them. To me, the colours look almost blended, like the colours were dyed after the shawl was knit. I like how knitters who notice are going to think, "What? How did she do that?"

The shawl sits nicely on my shoulders and doesn't want to fall off.
I think the length is nice, covering my entire back. The asymmetry can be seen but it's not really obvious.

It hangs naturally straight down the front, like an open cardigan.
The asymmetry is much more obvious from the front as the stripes don't match up.

I can throw one edge over my shoulder if I want to be covered up front as well.
But it will take a shawl pin to keep it there.

You can't photograph a shawl without a twirling picture. :)
And you have to have a full view over outstretched arms.
Look at some shawl patterns. You'll see it's required.

I also tried it with the ends tied behind my back.
This would keep the shawl secure.

From the back, you don't see the knot (but I would feel it behind me if I were sitting).
If I pull the shawl up just a bit and fold under the centre, it makes a nice warm "collar" at the back of my neck.
Project Stats
Started
: 26 May '17
Finished: 17 Jun '17
Pattern: Adaptation of Elizabeth Zimmermann's Pi Shawl
Materials: Handspun Malabrigo Nube (Archangel 64g, Azules 63g, Lavanda 113g); Garnstudio DROPS lace (88g leftover from another project)

The Knitty Gritty:
Shaping:
I started with 5 stitches so the shawl would be a little more than half a circle. (4 sts would give a half circle.)
Increase to 10 stitches on row 2
Increase to 20 stitches on row 4
Rows 1-4 were considered the first eyelet section. Continue to make eyelets every 6th row.
I measured shaping increases by eyelet sections instead of rows:
Increase after 2nd eyelet section (row 10) (40 sts)
Increase after 4th eyelet section (row 22) (80 sts)
Increase after 8th eyelet section (row 46) (160 sts)
Increase after 16th eyelet section (row 94) (320 sts)

Stripes:
Work the first eight eyelet sections in colour A (Archangel).
Switch to colour D (neutral) and work 1 row (increase row).
Work short rows as follows:
Purl 6, slip 6, turn.
Wrap the first stitch on the right needle with the working yarn and return wrapped stitch to right needle (it is not worked), making sure not to pull the working yarn too tight. K12, securing yarn float you work first 6 sts. (*See description below if needed.)
Purl 18, slip 6, turn.
Wrap the first stitch on the right needle with the working yarn, K24, securing yarn float over first 6 sts.
Continue in this manner working 6 additional sts on every row, making sure to do eyelet rows as each section reaches 6 rows high.
Once you have worked across all stitches, work straight for one eyelet section. You will work across all stitches each row but you will still have to do the eyelet pattern by section. You will not be able to do an eyelet row across all sts.

Switch to colour B (Azules) and work short rows the same as neutral section.
Once you are working all stitches with B, continue working all stitches for 4 eyelet sections.
At some point in this colour, you will have to start working the last increase row, section by section.
For each section of 6 sts, when you work the eyelet row, work (K1, YO) 3 times to increase to 12 sts in that section.
For short rows, you will now have to work an additional 12 sts on each row. Note that in the same row, you will be working 6-st sections and 12-st sections. I suggest judicial use of markers!

Switch to colour D.
Work short rows as above but make sure to start on the skinny side of the previous stripes so that you begin to balance the shawl's shape.
Continue increase sections as before.
Once you are working all stitches with D, continue working all stitches for one eyelet section.

Switch to colour C (Lavanda) and work short rows as above, starting at the same edge as previous section.
Since the increase row is complete, each section is 12 sts.
Once you are working all stitches with C, you should be "caught up" with the short rows so that each eyelet row can now be made across one row.
Work even for 4 eyelet sections or to desired length.
After final eyelet row, work three rows.
Bind off.

For hem, fold on final eyelet row and stitch bind off edge to back of shawl.

Weave in ends.
Block.
_________________
*Securing yarn float:
Work 1 st as normal; insert needle for next st, put yarn float over tip of right needle, work next st, passing working yarn under yarn float as you make stitch. Repeat.
Depending on yarn and project, you can secure yarn float every 2nd, 3rd, or 4th st as needed. I chose every 2nd stitch for this project so the float would be picked up above eyelets and not be visible.

Saturday, May 13, 2017

Spinning All the Day Long

If you've been following on IG, you know I've was bit by the spinning bug. Or maybe more like an obsession.

And not the type of obsession where you do it for 30 minutes to an hour each night. No, more like once I pick it up, I can't put it down. I think last Sunday, I started after lunch and essentially didn't stop until well past bedtime. (Once I was close, I just had to finish the ball.) So maybe more like an addiction.

What I am working on is some fiber I started a year or two ago-Malabrigo Nube (colour Azules).
I had two singles already spun from some.
I had some plan for spinning a three-ply yarn, but it just wasn't coming together. (I had never found the third colour to use.) Anyway, I decided to just carry on and make two-ply yarn from the singles.

So that's what I did with my redneck "bobbins" and "lazy kate".
In not too long (you know it was finished the same day it was started!), I had this two-ply yarn:
Spinning singles is fun and all, but plying is super fun. It's fast, requires a lot less work, and you get to see the final yarn! (It's also really fun to watch the interplay of the colours on the two singles coming together.)

I didn't measure but something in the process made me note that I think it's about 250 yds. It's a little too loosely plied and there is a chance I may hit it again and fix that.

Once that was done, I turned my attention to the sister yarn in colour Lavanda.
I had half of it already spun.
I ended up splitting the second half of the fiber into two hanks because it was too much for my spindle to do all at once, and at the end I had three hanks of singles:
They measured 252m (275yd), 184m (201yd) and 124m (135yd).

I think you can see the colour difference between the middle (larger) hank and the ones on the outside. I believe I split the original roving in half lengthwise, which normally would make the two halves match, but apparently one side had more colour than the other! (Or something about how I spun them - two years apart - changed how the colour played out.)

I set about plying them together (combining the two different colour tones) and ended up with these two squishy hanks:
They looked like a matched pair (which is good) and I think I got a much better twist on the two-ply this time. (This is what encourages me to take a second run at the Azules.)
The yardage of these two hanks is 162m and 116m, 278m (304yd) total.

Maybe because I was still stuck on the three-ply yarn, but I kept thinking that I needed a third partner for these two yarns. Maybe if I were in stores more often, I would have purchased more (roving was hard to resist even when I wasn't spinning) but then I remembered this yarn:
It's the same fiber as above in the colour Archangel.
I spun it back in 2014. It was definitely a beginner project. I still really like the colours and I like the yarn, but I just don't knit with bulky yarns that much. And certainly not inconsistent almost thick and thin bulky yarns. I like them, (they're really pretty), but I've realized I don't really like to work with them.

This would have made an interesting cowl (I think there was enough yardage) but I didn't need another short bulky cowl. So it sat in a box until this week, when I pulled it out, untwisted the plies and then respun the singles to match the other two yarns:
Or I'm working on it anyway. I have the first half done and a good start on the second half. Then I'll ply them together and then I'll be ready to find a project for these yarns.

I saw this shawl pattern recently:
Briochealicious by Andrea Mowry
It uses three colours with a constant colour running through. (the striped sections are brioche stitch). It looks lovely to me but I'm not sure it's the exact thing I want. (And I'm not sure I have enough yardage.) But I'm thinking something along these lines. (Because I don't need another short bulky cowl, but I don't have enough big-ass shawls, right?!)

I went through my stash recently (looking for that Archangel yarn, now that I think about it) and I found a good amount of a light "natural"-coloured wool/silk mix that may do. Once I get this last yarn finished, I see some swatching in my future. I'm looking forward to finding out how these yarns will knit up.

Friday, July 31, 2015

First Item from my Handspun Yarn

I had spun 2 ounces of Blue Face Leicester, some of the fibre I got in a kit at Christmas. I showed it to you at this stage:

but it looks like I didn't get a picture of it after I wound it into a cake. Too bad because it was really cute and fuzzy. But maybe that's like a mother calling her baby cute. Of course she thinks so.

Anyway, I ended up with about 140 yards of yarn with a fairly even thickness. I was thinking it would make a nice swatch of a traditional lace. Maybe a miniature Shetland lace piece.

When I noticed the fair had a category (yes, one category) for something made from handspun, I became motivated to find any pattern that I liked that would work. I finally settled on a simple lace tam. (Etoile Hat by Linda Irving-Bell.)

I got a start on it before my road trip last week because I was counting on some knitting time in the car. (At first I wasn't going to bring it because we were going to be camping, but then I realized I could keep it in the car. Problem solved.)

I knit away happily on my tam in between naps. It wasn't until I finished the patterned part and started on the ribbed band that I noticed something was wrong:
Somehow, right from the start, I had done nine repeats instead of eight! (Yup, count the points; there are nine of them.) At first I thought maybe it would be ok because some people on Ravelry said the hat was too small and my yarn was a little thinner than the yarn called for and I was using a size smaller needle. I had a lot of good-sounding justifications going on in my head, but the hat was just way too big. There was one problem it did solve however--I was wondering if I would have enough yarn. Now I knew if I had enough for nine repeats around, I would have plenty for a hat with eight repeats!

I put it away at that point because I couldn't stomach the thought of pulling it out. I was also worried about the yarn. It was pretty fuzzy (which makes it stick to itself) and I had made it (therefore I was always suspicious of its durability).

A day or two later while sitting around the camp, I realized that it was "find out the truth" time and I had to try frogging it. I pulled gently and wound up the yarn, and it held up quite well. It pulled apart in two spots, but I decided those spots needed to be discovered or they might have come apart in the hat itself and caused a hole. So all was good.

The second time through I tried to fix a minor foible of the pattern chart and got myself confused.
I put away at that point and tackled it again in the car. I managed to figure out what was going on and then happily alternated knitting and napping all the way home.

When I got home, it was thiiis big:
Yup, almost ready for the ribbing. I worked on it over the next few days and then suddenly it was done! I blocked it over a small plate and got this:
 And the back side:
The ribbing was ok before blocking, but I'm afraid the blocking has completely stretched it out. It doesn't have a lot of bounce to it. Fortunately the hat is the right shape and the yarn is the right fuzziness that it sort of just sits on your head and stays there.
 I found it very comfortable, and I have to say, I love it! (I am smitten.)
 And in the less than 10 minutes I had it on, my head was very warm.
It will be fun to wear it when colder weather comes.

May I suggest?

I Say! or at least I did once...