Showing posts with label altered book. Show all posts

Monday, December 21, 2015

Comfort Book

Let me introduce you to the project that has been my "baby" over the last few months. I'm calling it my "Comfort Book."

Ten years ago, my father died and I received love and support from my community. Some of that came in cards.

I kept the cards in a little box. Not too long after, I knew that I was going to collect them together into a book somehow. I drew up a pattern for the cover of the book. A front. A spine. A back. I asked Troy to cut the shapes out of wood and he did.

These things sat together in that box for a long time. I would see it every now and then as I went through my crafting supplies for some reason or another. Packing to move. Searching for some tool. But I was not moved to do anything with them.

It's ok for projects to sit for a while. Sometimes a long while.

Then I took the altered book class at Squam this past June. I did some work on my "starter book." Once I had my own supplies to work with, I did some collages on sheets of paper and a canvas .

And then one day I saw those cards and the wooden cover pieces and I knew it was time.

I started with what was easy for me. I took the cards to the sewing machine, and I stitched ribbons onto some. I stitched decorative stitches. I added lace. I didn't worry too much about what colour thread was in the machine and one time I ran out of thread but I kept stitching because the holes punched in the paper after the thread ran out was still interesting.
I asked the quilters group on Ravelry if any of them had scrap or extra ribbon or lace that I could use. Three people sent me an envelope full, no charge. So generous! One gorgeous wide ribbon was added to this card:
I had enough for two edges so I did the side and bottom. It's sewn onto the bottom flap of the card (pictured right side), but looks great with the cover (pictured left side).

Here is another one I added a lot of ribbon to:
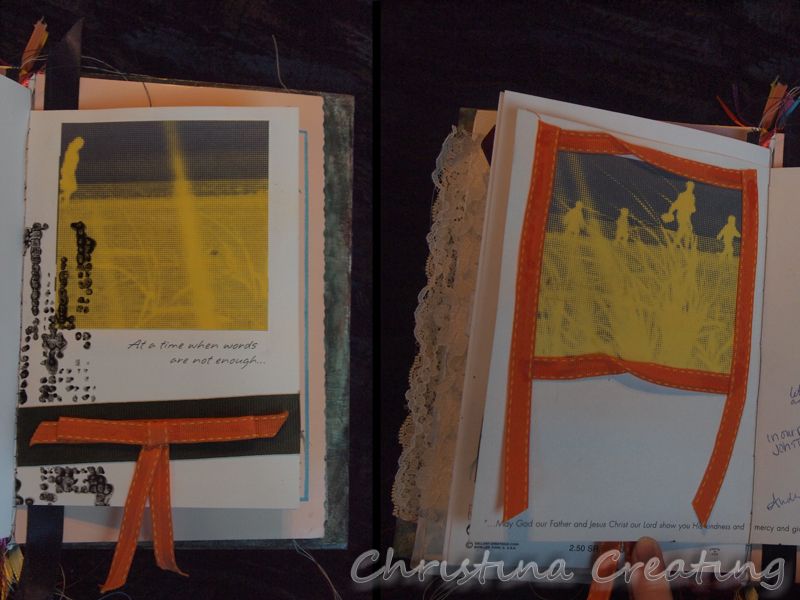
The card originally had pictures of tulips on the cover. They were nice, but I went ahead and covered it up with part of a picture taken when I was with these friends on the beach in South Haven. I used another portion of the picture on the inside.

A lot of this was not done with a lot of rational thought or ideas of why. I enjoyed spending time with these cards and adding ribbon, lace and thread wherever seemed right.

I did this over multiple sessions over a couple weeks. I find creative work tiring and although I would start it with relish, at some point I would feel completely depleted and have to tell myself to stop.

Once I finished the sewing and stitching I wanted to do, I moved on to adding photo transfers. I learned in my Squam class that there is this magical marker that will transfer pictures printed on laser printers/copies onto other papers.

So I printed some pictures at work on the colour laser printer we had (which just died this week so I was just in time!) and on the black and white photo copier. I printed two sizes (3.5x5 and wallet) and multiple copies of each picture in b/w and colour.

I then added them to cards as seemed appropriate:
The one in the top left yielded an extra surprise. I transferred the photo onto a card that had embossed shapes. So the white butterflies and flowers you see are just where the transfer didn't reach because the paper isn't flat. But it worked out so perfectly!!

I had a couple of cards from flowers that were sent, so I put them into some blank cards I had and dressed them up too.
Then I went crazy with the texture. I put my stencils on the cards and filled them in with molding paste. Once it dries you have these square bumps on the page. I love the effect. (If you look closely, you should be able to see it in the two pictures above.) To some I added colour with paint but most I just left white.

I took a sympathy card I had in my own card stash and turned it into the cover page.
I put the text on the paper with the photo transfer technique so it looks old and worn. It says:

Comfort Book
A collection
of the cards
good wishes,
prayers
and
love
bestowed on me
upon the loss
of my father.

On the inside of the card, I put the obituary and a picture of dad with me and my sisters when we gave him a sort of memory quilt we made when we knew he was sick.
Once the cards were "done" (does it ever feel like it's done?) I took the time to spray them all with a sealer or fixative. That was hard for me because I was very eager to get to the binding part!!

I used a sewn binding where you sew each card to the one next to it, making a chain of connectedness.
It was a little tricky because the cards were different sizes but I made it work. (Perfection not being a virtue I was pursuing. Quality workmanship--yes. "Perfection"--probably not.)

By then I also had the cover put together. I used drywall tape to connect the front, spine and back like a Jacob's ladder toy. (I am fascinated with those things and have always been interested in making one.)
So there are two strips of tape that run on the outside of the covers and inside of the binding and then one strip that runs on the outside of the binding and inside of the covers.

PS Drywall tape is my new secret weapon. It's self-adhesive and is repositionable. It adds texture and can be painted. It was a great addition to many pages.
I then glued the backs of the cards to add a little strength and glued a piece of paper to them to add cohesiveness. I then glued the pack of bound cards to the inside of the spine of the cover. It didn't work. Once I opened the book and flipped through the cards, the pack released from the spine and wasn't connected to the cover any more. The cards needed to curve upward and would not stay glued to the flat spine.

So I took a different tack. I had already covered the back of the spine with rolls of magazine paper sealed with modge podge. I ran ribbons down through the tubes and inside the pack of cards.
When I looked through the ribbon that I had left and pulled out the narrowest ones, I didn't really like their bright colours. And only one of them was long enough to go all the way up and down the spine.

Just as a "proof of concept" I decided to use them anyway. (I figured I would replace the ribbon with ones I liked once I knew the method would work.) So I took the too-short ones and knotted them together in pairs. I ran one end down through the paper tube and the other end between the cards. And then I tied them tight at the bottom of the book.

And it worked! And once I had the ribbons in the book, I realized they were perfect and I didn't have to replace them at all.

Obviously I haven't shown you every detail and every page, but I think I was able to give you a good idea. I have been so excited working on it. You can see that I did not take any pictures while it was in progress. It was too distracting from the work to even think about it.

I recently took it to a gathering of friends and I seriously carried it around like it was my baby, sharing it with anyone who asked to see, but otherwise holding it protectively. (It's ok. I know: I'm a nerd.)

I am looking forward to taking it home and sharing it with my family. I want still to add personal memories, stories or vignettes from the time when Dad died, but I hope to talk about that time with my family first to make sure I'm remembering some things correctly and hear what they remember. I hope we will have time for it.

Tuesday, June 9, 2015

Spring Squam 2015: Turn the Page (Altered Book Project)

I was so interested in Colleen's process of making "altered books", her class was one of the chief draws to Squam for me this year.

After taking some time to think and write what feelings and intentions our book was going to be about, she had us start on the cover. First step was to lay gesso over the whole thing since I wasn't keeping any part of it.
After that, I'm afraid there are no progress photos as I was intensely working on it! I know I modge-podged on some old magazine pages, music pages, and other cutouts. I applied molding paste through a stencil to give some texture. I added texture paste and thinned paint to give a colour wash effect. I took a piece of tulle and sewed down the length a couple times and then modge-podged it onto the front for some more texture.

Progress at lunch time. Everything was left to dry
in preparation for the afternoon.
Colleen had given us each a packet of items to use and mine included a big three-legged metal object and a large button. Immediately I knew I would glue the button to the top of the metal piece and then glue it to the book. Originally I thought I could tie a ribbon around the book and fasten it to the knob to close the book, but it looked so much like a door knob that I kiboshed the ribbon idea.

In the afternoon, Colleen showed us how to get started on the inside pages.

Here are some pictures of my pages by the end of the class. Most are still in progress. Colleen's process involves a lot of layers so it takes some time!

Here is a page in the early stages. A strip of paper is sewn to the edge of the page. The page is treated with gesso and then "distressing" ink:
Here is a pocket with a page marker. The pocket is made by sewing the two pages together along the side and bottom.
Here are a few layers of vellum I sewed stuff onto before then sewing them onto a page in the book.
Here's a spread which includes a picture that was in the book. The left page might be done. The right page needs more and especially a main focal piece.
 Here's a detail from the left page where I added elements to the printed picture.
 Here's something I sewed together before gluing it into the book.
The translucent envelope contains a little key and the word "sacred". The way it is sewn onto the page, it would be impossible to get the key out. On the other page, the man there is so open. I liked the contrast. I may do more to these pages as well (especially the left).

Included with the supplies we could use was a large map that included both the area where I grew up and the area where I live now.
I sewed in strips of the map to a page where I had transfered a photo of a car. I sewed a little road for the car. :) It hasn't found a place in the book yet.

And here's another little piece I assembled but haven't placed anywhere:
The blue paper (both light and dark) is paper I made years ago. The stamping was "practice" when I was making some Valentine's Day cards. I thought it suited the little phrase cut from a magazine. It was sewn in like a tag on clothing.

Here's the back inside cover where I added some brick texture and the word I got from Colleen. It's cut from cardboard that would have gone to the landfill.
And when I needed a mental break or a little inspiration, this view out my classroom window worked very well:
As a last touch just before I was ready to leave, I made a tassel from some twine, gold thread, and netting for the front cover. And Colleen even had a little elephant for me to tie on!
It's amazing how attached you get to the book you've worked on. This book was heavy to start with and now it really has a nice heft to it. I just wanted to carry it around in my arm! (I'm not the only one--classmates said the same thing!)

I'm not sure how I'll be able to continue working on this at home. I don't have the supplies and feel like I don't have the space to spread out like I want. But supplies I can buy and perhaps I can just work on one page or one part at a time. We'll see.

May I suggest?

I Say! or at least I did once...