Showing posts with label accessories. Show all posts

Saturday, September 25, 2010

Beading During the Game

So it wasn't that I wasn't interested in the game. And it's not that I needed to distract myself from what quickly looked to be a losing game. (Not for sure, but just likely...) But my bead box was still out from when I fixed my mom's necklace and just having it out put my mind to beading.

There were a lot of beads in there that I thought were so pretty. So pretty I couldn't resist buying them. Why was I leaving them sitting in a box? Not inspired? Insecure about liking the results? Not in the mood for stringing beads? Well, no more!

I whipped out a lot of necklaces, earrings, anklets and a ring today. Ya, I know...wow, right!?

Here we go:

1. Necklace from golden brown stones that I love:
It's meant to be worn with the clasp in front. This probably isn't "cool" anymore as I remember my older sister showing me a necklace like this years and years ago. But oh well, I like it. I love these toggle clasps by the way. So simple. So secure.

2. Simple strand of light-weight wooden beads:
These are reused from another necklace that I didn't like as much. But I really liked the beads. And several times since I had the idea to restring them, I've wanted to wear it with an outfit I had on. But I hadn't made it yet. Well, here you go, self!

It's held together with a magnetic clasp, but very insecurely. The magnet is not nearly strong enough. When I realized it, I did not have the energy to restring the whole thing. So I will live with it. Hopefully nothing's yanking on my necklace anyway.

I took a few of the extra beads, added some smaller black ones and strung them unto a stretchy cord for a ring:
I finished it with a simple square knot figuring it would be hidden inside my palm. I wore it all afternoon and it was very comfortable. I've had some of these rings that were way loose or tight, but this one seems good.

3. Another simple strand of pretty brown beads:
I found these brown beads strung on a string in my box. So I had "laid out" the necklace, put it on a string and then...? What happened? The only thing I could figure is that it came out too short and that I didn't have the energy at that time to solve the problem.

But today I did. I added some little silver spacers between each bead (I had only one extra...phew! I was a little worried at the end) and that did the trick.
The brown beads are flat and highly reflective. I found them in three different shapes: large ovals, small diamonds and small rectangles (not shown). This necklace is a touch longer than most I make which would  make it longer than a choker but not by much.

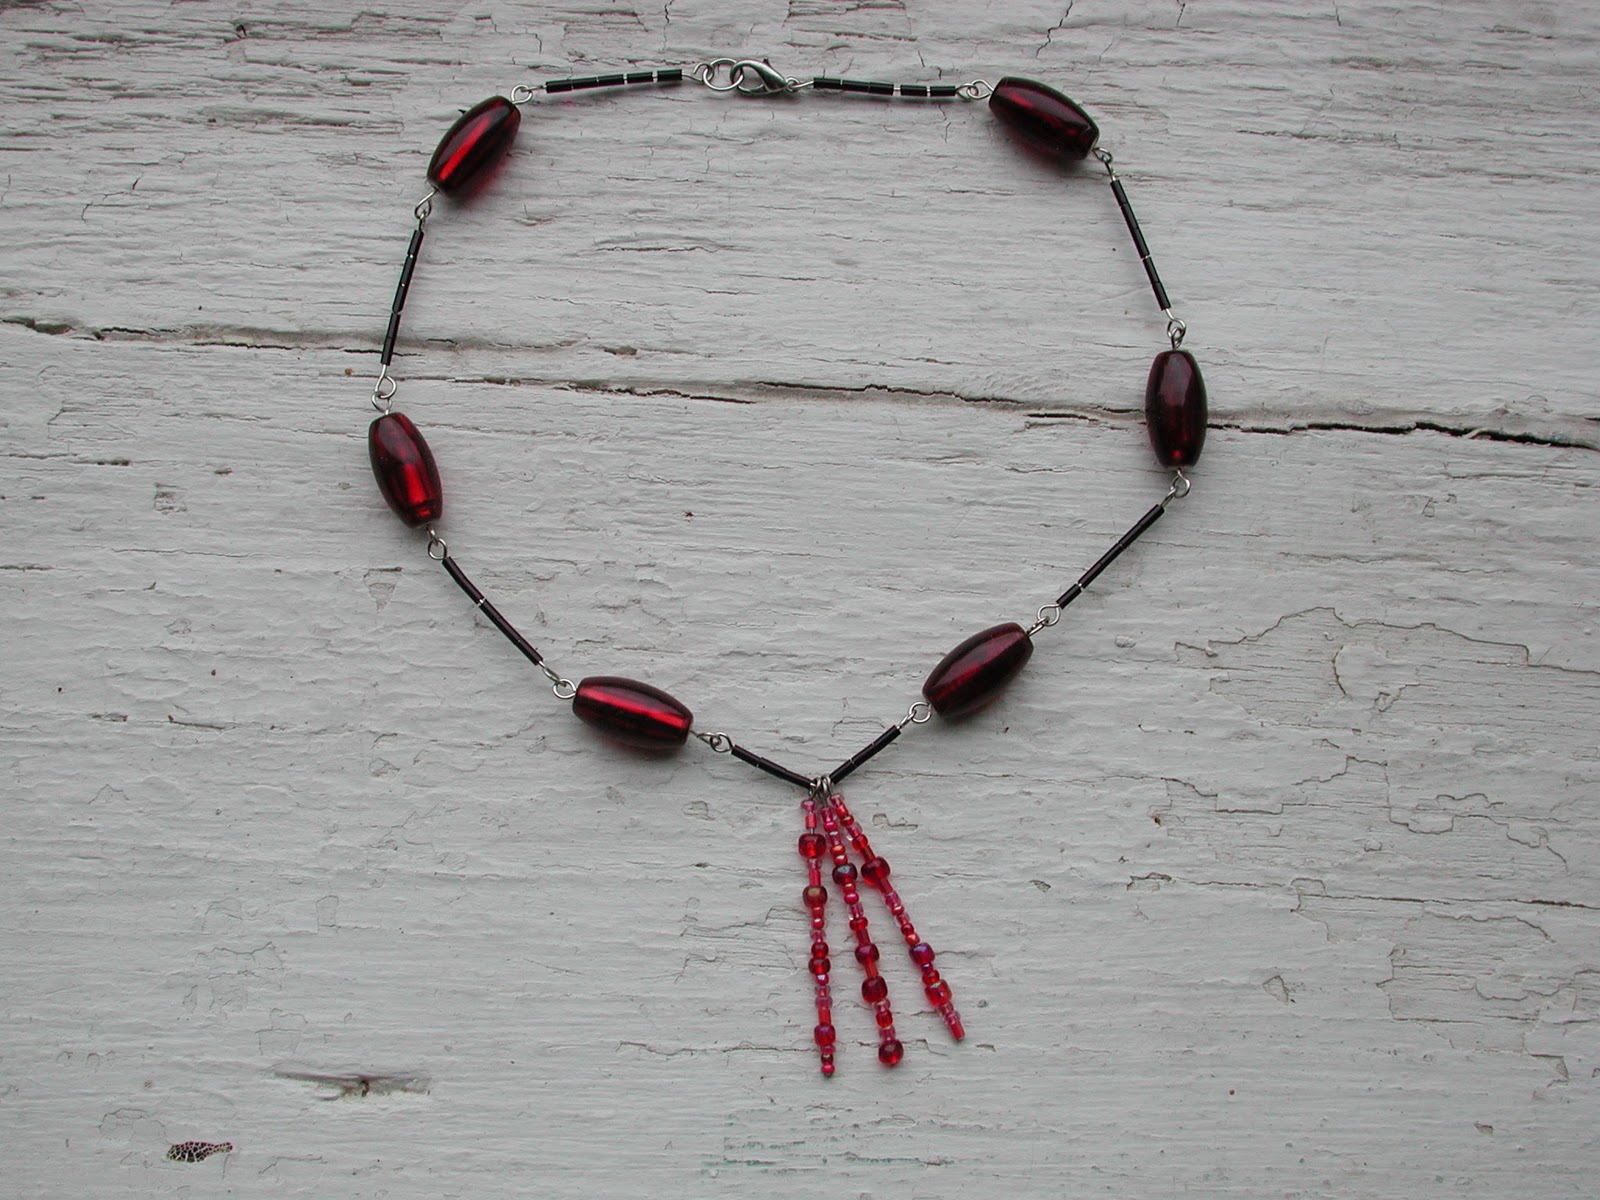
4. Red and black necklace:
Finally something different--I didn't just string some beads on a wire!

I took some extra red beads and put them on a wire with loops on each end. Then I separated them with black tube beads on wires. I put a bend in the center wire and hung some wires with various red seedbeeds on them.

I ended up with two extra red beads already on wires so I threw them on some fisherman hooks and now I have a pair of matching earrings.

5. Wooden bead necklace on leather thong:
I had a hard time doing a clasp the last time I used this leather thong so this time I just tied each end around the other string and now it is adjustable. There's enough friction with the leather that it doesn't slide unless you pull on it specifically.

6. Stone and shell necklace:
This necklace is made up of two strands. I liked the shells but couldn't quite see myself wearing a shell necklace. (Ok on a cruise, but not in my "real" life.) The other strand is made up of various stones and beads that I liked but didn't really have enough of anything to make a necklace with them.

I wanted to twist the two strands together but could not find a way to make them stay twisted.
Lucky for me, if I twist them and then do up the clasp, it stays that way. (When I unclasp it, it completely untwists again). I really love this necklace. The subtle colours, the interesting textures and shapes.

7. Two fun anklets: (Just in time for summer...oh wait...maybe not.)
The blue one is strung onto a stretchy material that clams to be "strong, stretchy, and easy to knot." The last part is completely untrue. Any knot I put in it came out with the slightest pull. I think I have it in place now with a couple of different types of knots. (A crimp bead just cuts through the stuff.)

The second one is strung on regular beading string. It was fun to do.

And that's "all." Now to figure out what outfits to wear them with...

Saturday, May 1, 2010

May KAL

I have been suggesting KAL patterns to Amy at Red Purl for a while now. Sometimes she jumps at them, sometimes...she doesn't. I had suggested this very cute Flower Scarf by Robyn Diliberto a couple times and I guess she now felt the time was right because she picked it for May's Friday night KAL.

My reward for picking the pattern? I got to knit the store sample.

It's a clever design. Besides just being cute, the center of the flower is actually a button that pops out of the flower. So you don't have to pull the scarf over your head, and yet it stays securely around your neck.
Or, if you like things around your head, some people at the store have been trying on the sample as a big fancy headband. It works!

The pattern is available as a free Ravelry download or, if you're not a Ravelry member yet, from Loopy Ewe. It was a fun fast knit, although you can a little bogged down in the Fisherman Rib. It's a slip stitch pattern so sometimes it feels like you're only making half the progress for all the work, but then suddenly it's long enough and you're done! The upside is that it makes for a wonderful deep, plush, yet relaxed rib.

Amy is featuring Blue Sky's Alpaca & Silk for the pattern. It is a truly wonderful yarn. It feels so soft, and it's lightweight yet substantial. The alpaca gives you warmth and the silk gives the yarn a beautiful sheen. It feels good to work with too. (Can you tell I like it?...a lot!)
Tips:
  • I used one size smaller needle for the length of the scarf. I'd recommend one size smaller than that for the button, and one size larger for the flower.
  • You'll need to start the flower on dpns, but after you've done a couple increase rows you'll need to switch to magicloop or cable needles, or start using more than five dpns.
  • As the pattern says, do not overstuff the button. Also, stuff it with some of your yarn scraps so the stuffing will match. White polyfill will show through. (That wasn't too bad on my light pink sample, but it won't be nice on the purple one I'm going to do for myself.)
It was a nice rewarding knit and the final product is lovely. Whether it's for yourself or a gift, head to Red Purl for some Alpaca & Silk in your favourite colour and join us in the KAL!

Sunday, April 25, 2010

Purse: Finished!


Today it was raining, so I couldn't get siding checked off the "Spring to Finish" list. (Aw shucks!)

I did, however, get my sewing machine set up and supplies pulled out for the purse I wanted to make.

And what do you need to make a purse?


Well, I started with a square knit from some bulky&thin wool, two handles, fabric for lining, magnetic clasp, and trimmings. Project Stats
Started
: 29 Jan '10
Finished: 25 Apr '10
Pattern: none, I made it all up
Materials: wool (gift), ribbon ($10), flowers ($6), handles ($6), clasp ($2.15), lining ($2.10)
And a plan! I wrote up some measurements and jotted notes on what should be done first to make sure I didn't get stuck somewhere.

Up first: sew the knit fabric up the sides to make the purse shape. The bulky&thin nature of the wool did not make it a good candidate to use for seaming. But I happened to have a thinner wool in a colour close enough to work wonderfully. (The wool from the J Crew sweater I used for the Bella Mittens.)This is what I measured to get the numbers for the rest of the pieces. You may recall I knit this up with a skein that my mom gave me this winter. I didn't follow a pattern, but just knit it as big as I could with what I had.

Then it was time for a lining.I bought the trim at Soutache last week and thought it would be a nice way to finish off the top of the lining and give it some structure. In the picture, I have the lining right side out so you can see the "nice" side but of course it will go into the purse the other way around. Notice there are a couple pleats to give the purse a little fullness.

Once the lining is together, you need to add the magnetic clasp and handles:Isn't that some lovely basting?! ha ha. The lining fabric was so slippery and "shifty" that I had to baste--pins wouldn't hold it. The sleeves that hold the handles on were sewn so they would end up between the lining and the outside knit fabric. The magnetic clasps are not visible in the picture but were installed through the ribbon, just below the handles.

Then I pinned the lining into the bag and sewed it in by hand.My stitches are nothing to show off, but the red thread on red ribbon hides it pretty well.
I'm really happy with the look of the lining, and I even managed to get the lightest colour to land in the middle--centered and matched left to right sides. (A wonder!)

And unable to leave well enough alone, I added a little bling bling. (Do people still say bling bling? I suspect not. But, really, what else can you say about gold, silver and bronze sequined flowers?)I love it!

Sunday, April 18, 2010

Care to Lend a Hand?

Two weeks from today I will be walking in the Michiana area Stop AIDS Walk.

I've been walking since 1995 when my brother died from AIDS; I've not walked every year, but just about!

The first time was in Halifax, Nova Scotia. It was a great Walk: lots of people, police escorts, and we walked down the middle of the streets in downtown Halifax. Music and free food afterwards! I didn't make much money that year, but it was great to participate in a group event for the cause.

Since then I've walked in Belleville, Ontario (smallest); Grand Rapids, Michigan (got on TV); Chicago, Illinois (largest); Toronto, Ontario (with the most family); and in South Bend since moving to the area in 2000. Over the years, I have raised over $5,500 to fight HIV/AIDS!

This year I'm shaking things up a little bit to keep things interesting. If you sponsor me for the walk, I will give you a chance to win a pair of Fingerless Gloves handknit in the very luxurious Alpaca & Silk from Blue Sky. I've got one done already so you can see exactly what you're getting, and the other one I'll knit on the Walk!

Here in in South Bend, the Walk is the main fund raiser for AIDS Ministry/AIDS Assist. The people there help educate on AIDS prevention, advocate for people living with HIV/AIDS, and help with housing, meds and emotional support.

They do good work.


If you would like to get involved and sponsor me in the Walk...and of course get a chance to win these fingerless mittens...please email me: christinacreating AT netnitco DOT net. Anyone who gives $10 or more will get their name in a [virtual] hat and have a chance of being a winner!


Details: Winner will be chosen at random. Winner must pay before the mittens will be sent. (If not paid within two weeks, another winner will be chosen.) Chances of winning will depend on how many sponsors there are!

Sponsored by Red Purl, a wee knit shop in Niles, Michigan.

Monday, September 21, 2009

Completing the Look: Part 2

I've got another necklace to share with you. While making what should have been a quick stop at Hobby Lobby, I saw that beads were half off. Well, at that price I have to look...

I bought a variety of glass beads in reds, greys and black to make a long necklace to match my Deep V Argyle Vest. I wanted something substantial enough to hold its own against the argyle pattern and long enough to balance the deep Vneck.

The simple strand can be worn long or doubled for a shorter style. It's pretty thick and chunky when worn doubled, but I think it'll work for some outfits.


The glass beads look too good to be true. Very luscious. The observant among you will notice that I used more of my dad's hematite beads, putting them on either side of the big grey squares.

I used the same wire cable as the last necklace to string the beads. In this case, I decided the necklace was long enough that I didn't need a clasp.
I just looped the cable ends around each other and caught each end in a crimp bead. (Keeping it simple!)

And a necklace wouldn't really be complete without earrings, would it?
I took a couple of long beads and the same wire cable, ran the cable ends through the bead and caught the ends with a crimp bead again. String it onto some fisherman hooks, and they're all set.

And how does it all work with the vest?
Not too bad, right?

Sunday, September 20, 2009

Completing the Look: Part 1

Once you finish a project you're going to wear, you need to think of what you can accessorize it with. I had nothing that I thought looked good with my Pioneer Tshirt so I jumped at the chance to stop by my favourite not-quite-local bead shop.

I wanted something fun and casual. (There's no need to try dress up a Tshirt!) And I was going to keep it simple.

I've been stuck in my beading lately, trying to do too much (without the skills to do it), and finally realized that people have been stringing beads in a simple line for eons; and if it was good enough for all of them, it was good enough for me!

What I found at the store were some pink-and-white and mint-green-and-white beads that I really liked. I alternated the colours, and used some larger oval green beads in the center, moving up through three sizes and shapes to smaller green ones at the ends. The pink beads are the same throughout.

My very favourite beads are the medium sized green ones. They have a twist that is just irresistible.

I used a different material to string the beads. Tired of the crimp beads fraying the string (even Kevlar string), I used a small wire cable. ("Stainless steel nylon coated miniature wire cable; 3 strand, .015 diameter" if you're curious.)

It has enough flexibility that it hangs appropriately, but enough strength that I'm not worried about it coming apart.
It also simplified putting on the clasp. The thicker cable is more secure in the crimp bead so I just threaded it through the clasp and then back through the crimp bead. Crimp, cut it short and done.

And how does it look with the Pioneer?
Pretty good, I think. The bead colours are brighter than the pinks and greens in the shirt, but it works. I like the length, and the necklace hangs nicely.

I wanted to add a bit of history about the bead shop I like. I had been there a couple times before I noticed a little frame hanging on the back of a door.
In it was detailed the history of the builder and long time resident of the house. I don't remember all the specifics, but this was a woman who had gone to college in the 1910's against the wishes of her family. She worked for a time but then moved back to her hometown to take care of aging relatives.

She decided to build her house and did exactly that. She did every bit of work on the house except the electrical work.

Does that put the items on your "to do" list in perspective or what?!

Wednesday, May 20, 2009

Plarn Gets Fancy

You may recall that I made another plarn bag while teaching the class at Red Purl. I made the small size so that I wouldn't have quite as much work to do. (I'd hate to have the students waiting for me.) It turned out as a nice little purse size. Or a small project bag, if you prefer.

I then had some fun with the brightly coloured bags that I had been saving. I mean once they're gone, they're gone. But the time had come to break them out and cut them up.


I made three different styles of flowers with patterns I picked up from Ravelry. (Where else?) The first pattern was a two-tone designed by SkaMama that I did in white and dark green.

The second was a simpler two-tone number by Drops design. I used a lighter green with pink.

And the third was a very simple two-round crochet flower by Mimi Alelis' Crochet and Other Stuff.

I adlibbed the stems, first crocheting them and then finding it easier to do the chain stitch with a tapestry needle. I also improvised the leaves. I just sewed them down with a few stitchesProject Stats
Started: 16 Apr 09
Finished: 13 May 09
Pattern: my own
Materials: Walmart bags &
various other
Size: 11.5" x 11.5"
of plarn right down the middle.

I think the flowers helped the bag a lot but it's not the sort of thing I'll do all the time. A little too fussy for me. (I'll take 3 hours of straight knitting or even crochet over 1 hour of fiddly stuff any day.) But sometimes you just gotta do.

The plan is to give this to my cousin. I think I gaffed on her Christmas present last year, and hopefully this one will better represent the sincere affection I have for her.

Sunday, March 29, 2009

Good Goodwill Find

Problem: The scissors I carry in my project bag like to come open and this scares me into thinking that they might inadvertently cut something. It's an irrational fear since they really are not that sharp, but still a constant nagging worry in my mind.

First solution: take a scrap of yarn and tie the scissor handles together so it is impossible to cut anything without absolution intention of doing so. This put the fear to rest, but it made it less convenient to use the scissors what with the tying and untying all the time.

Final solution: find a fabulous wallet at Goodwill that you think is half off (and later find it isn't but buy it anyway) that perfectly fits your scissors and even has room for other sundry like darning needles (kept in the zippered pocket), measuring tape, stitch markers, needle gauge, etc.
It lies very flat and fits into my bag wonderfully. It's been nice to find all the most-looked-for accoutrements all in the same handy place. It doesn't hurt that it is beautiful (despite a little wear) and was made from sheepskin leather in India.

I love repurposing. I love Goodwill.

May I suggest?

I Say! or at least I did once...