I mentioned that I bought a kit for the 2014 county fair raffle block. (By the way, they got their raffle license on Thursday of the fair and were able to sell some tickets. I didn't know and didn't have a chance to win, but at least we know the blocks will be made up into a quilt. I found out on Sunday when I went to pick up my things.)
Anyway, back to the quilt block. I bought the kit on the Saturday when I was helping with the check in and judging. The theme is the underground railroad and the entries are limited to the 15 blocks listed and pictured in the kit. All piecing (no applique)...yay!! In case you're not familiar with the story, these blocks were touted as a code for helping slaves to escape along the underground railroad. It's complete bunk but people love the story so the tradition has continued. (
Read here for a thorough debunking.)
Over the weekend I studied the blocks because I was determined to not have a last minute entry next year. Plus I was interested in the blocks. My personal choice was quickly narrowed down to two of them, the Carpenter's Wheel and the North Star. I started googling how to do the Carpenter's Wheel because there were several possibilities that came to mind.
A
Google Image search shows lots and lots of blocks that look like this:
Which was
not the way it looked in the kit. I liked the ones on the web better and started to wonder if the blocks had to look exactly like in the kit's picture, or if it was a block with the same name but an alternate design would that be ok. I debated about asking about it, and in the end, when I saw the superintendent on Monday night at the fair, I asked her.
I showed her the picture above and explained that that was the most common way the block was done according to my web search. No, she said, it has to be exactly like the kit. We talked for a few more minutes but I basically got the same response to anything I said: It has to be exactly like the kit. "Even if the kit is wrong," I thought.
Anyway, I quickly dropped it and debated whether to do the block I liked better the "wrong" way or my second choice. Then I did a search for the underground railroad quilt and got
this result. It shows the Carpenter's Wheel just like it was in the kit. That made me feel better that the fair didn't have it wrong, but I think it's funny that not only is the story behind the quilt complete bunk, but they can't even get the blocks right.
Then I took a big breath, decided I wasn't going to create problems that don't need to exist and started my own Carpenter's Wheel block in the design prescribed by the kit. It's the most complicated piecing of all the choices and I plan to do it the "purist" way.
The picture above shows the block done in all half-square triangles. All the seams are straight and you can assemble it in a grid. But all the sections that are made of one fabric are chopped up into little triangles. So if you have a print, there will be no continuity. I decided that was not for me. I will make a pattern with as big of pieces as possible, even if it meant tonnes of inset seams. Bring it on!!
As always, first step was to make a plan:
I drew out the pattern (over a grid so I could easily see measurements), and listed out the pieces I would need to cut. The finished block needs to be 12", so each square on the grid will finish at 1.5". That's small, but not tiny.
Then I pulled out the quilt scrap box and started pulling out some options.
(Because there was no way I was going to make my first attempt on the kit fabric!)
I got the pieces cut and sorted:
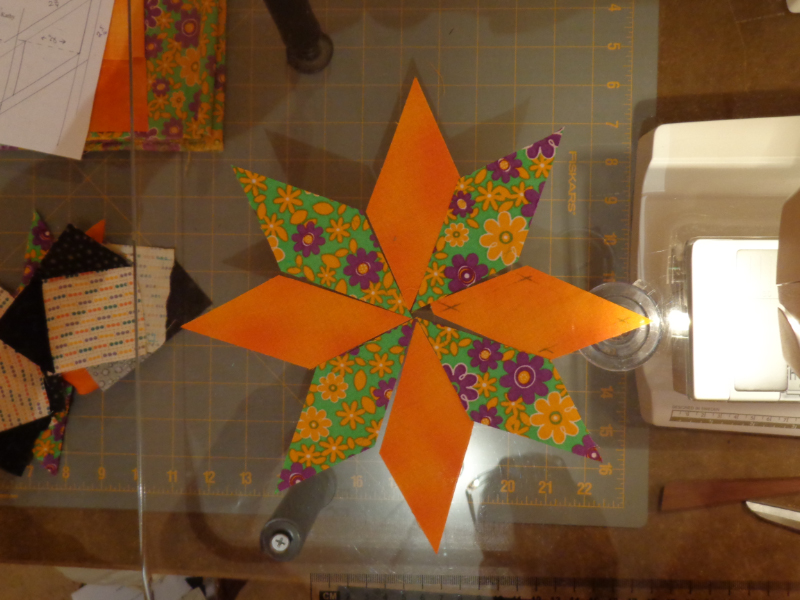
and even "dry fit" the center star to make sure it was going to fit together the way I thought it would:
(Plus it's just kind of pretty.) I was very proud of myself for noticing that these pieces were mirror images of each other (by colour group)
before I cut out the first set. Yay, me!
That was Tuesday evening.
Next was the plan of assembly, what parts had to be attached to other parts, and then how it would go together:
I would start in the center with the star. A lot of inset seams here. The most important thing to do is to mark all your 1/4" seam allowances. Do not let yourself think you can eyeball it! Especially on these angled pieces.
Lay two together,
and start sewing
toward the corner. Start at a distance that you'll do 3-4 stitches before you get to the corner:
Then stop the needle right at the corner with the needle in the down position:
If you can see your next stitch is going to take you
past the corner marking, then turn your stitch length down. (I did these seams at "2", but often switched to "1" at the end to make sure the needle hit in the right spot.)
Then pivot the piece and sew the length of the seam:
When you get to the other end, once again put the needle down right at the intersection, pivot the piece and sew 3-4 stitches the other way to anchor it.
Normally I would anchor the end of the seam by going back and forth, but machines are a little unpredictable at when they start changing direction after you push the button. Often they take one more stitch than you expect and that will be death to your inset seams. This pivoting method may seem like more work, but it doesn't take much and it's very reliable.
I continued around the star, adding pieces and here you can see it finished with the side pieces being dry fit:
That was Wednesday morning.
Next step was to fit in the side pieces in the same manner. Line up one edge, sew it from intersection to intersection, then sew the next edge. I soon had all the side pieces done and was looking at adding the corner pieces:
 |
Apparently I didn't photograph the corner pieces being
assembled but I did them as two squares plus a rectangle.
One less seam than doing a 4-patch. |
That is where I ran into a problem. The corner pieces didn't fit onto the star--the star was too narrow.
That stopped me in my tracks. I looked at the plan and thought about it some more but I just couldn't see it. It was obvious what was wrong, but if I didn't see where it came from then it was going to be hard to fix it.
Not ready to quit, however, I started doing the outside "border" strips. First thing was to assemble the flying geese units. My favourite method so far is to use squares to add triangles to the base rectangle. So you start with a rectangle the size of your finished piece. You add a square that matches the length of the shorter side. Lay the square on the rectangle so three sides line up and sew along the diagonal, point to point.
Yes you need to mark the diagonal. If you think you can eyeball it you are a proud fool destined to fail. (Ask me how I know!)
Once the seam is sewn, cut off the excess (the part toward the corner of the rectangle, not the middle).
Usually I do use a rotary cutter, but I didn't have mine handy so I used my scissors. Not quite as accurate or straight, but since the seam is already sewn, it doesn't really matter now does it.
Then you flip the triangle-that-was-a-square and press it with your wooden "iron." You can also use your fingernail, but the wooden tool works great, it's pretty and cheap. So why not.
Then put a square of the same dimensions on the other side and sew across the diagonal:
Note that the seams have to come to a point in the middle. Sewing across the other diagonal would not make a flying geese unit.
Cut off the excess:
Press over with the wooden iron and you have a flying geese unit:
I chain stitched these (meaning I did the same seam on all eight pieces before moving to the next step) so it was quick to get them done. (It would have been quicker if I hadn't put four of the blocks on the wrong side of the rectangle the first time, but that is what a seam ripper is for.)
Then I lined up the flying geese units with some solid squares and rectangles in the appropriate order and got the border strips done:
That was Wednesday night.
The whole evening while I was sewing I was also pondering my error in the star measurements. By the next morning, I thought I had it figured out. First step in any case was to remove the side pieces from the star, and so my seam ripper got another work out:
Pieces separated.
Then I worked on my new pattern. I thought my problem was the bottom edge (as seen in the following picture) of the star piece. It was supposed to finish at 1.5" and so I cut it at 2". With 1/4" seam allowances that should work.
But I started to think that it only works when the seam is perpendicular to the cut. In the star piece those seams are at a 45^ angle and so just adding 1/4" on each side wasn't going to work. What was?
Well, I decided to do this a more empirical way instead of a theoretical way. I drew the finished piece I wanted on the paper above. Then I went around and added the 1/4" seam allowances. Then I measured the length of the bottom edge. Sure enough, it was closer to 2.25" than 2". I was ready to start again. Except that I had to go to work.
That was Thursday morning.
When I first cut the star pieces, I was able to measure the 2" on the bottom edge on my cutting mat's grid. But it doesn't have 1/4" markings. What to do?
I laid my ruler on the mat so that its markings matched up with the mat's. Then I laid the strip I was cutting against the edge of the ruler so that the point was at 1/4" mark.
Then I could count back 2 1" blocks back on the mat and cut my other edge:
Worked like a charm.
Then I marked the seam allowances again
When I cut the pieces out from the other fabric, I was having trouble figuring out the angles and directions to cut them in a mirror image to the first. Then I realized I could follow the exact procedure as long as I laid the fabric wrong side up.
Again, worked like a charm, and I once again took the time for a dry fit:
 |
I switched two of the purple pieces in the final layout
as I wanted the two with the most purple to be opposite
each other. I know it's only a practice piece, but
you still have to care! |
Then I started sewing the star. I certainly did not sew the whole thing before I checked if I had fixed the problem. As soon as I had two pieces together, I added a side piece:
Add one more star piece and I could check the "troublesome" corner pieces:
Looks like a perfect fit...yay!!
I continued around and got the center portion done:
I finished at 10:58, and seeing as it wasn't
quite bedtime, I continued on. I added the border strips and here it is, fresh off the machine:
Although it was now 11:17 and I really should go to bed, there was no way I was going to be able to sleep without pressing it!!
I took my time and got all the seams going in the right order.
(I had been pressing them with the wooden iron as I went so I knew they had all worked out--meaning they alternated directions in all the right places.) But boy, it was nice to get them flat!!
I even managed a nice little pinwheel in the center of the star where the eight seams meet:
And voila! a Carpenter's Wheel block:
That was Friday evening.
What a lot of work for
one block!! I took measurements and it is 12.5" on one side (the correct measurement to finish at 12"), but the other side is only 12.25". That might get me disqualified. I also noticed the star is a little puffy and I had to ease it into the seams that were too short before. So now when I cut into the kit fabric, I will know to back off the size a little bit on those pieces. (This is why we practice!)
I also may make the border pieces a little too wide so that I can trim them back down if necessary. Cheating a little, I know, but that's what will get the job done.
Although I'm raring to get this done and put it in the can for next summer, a few other things around the house are calling for my attention. Will I be able to wait?? Tune in next time to find out! :)