Showing posts with label group project. Show all posts

Sunday, January 11, 2015

Epiphany

Similar to the Easter installation our church did in 2011, we were invited to participate in another one for Epiphany this year.

On the Sunday before Christmas we were invited to take home a "square" and have it done and turned in two weeks later. Today was the first day we got to enjoy it in our sanctuary.

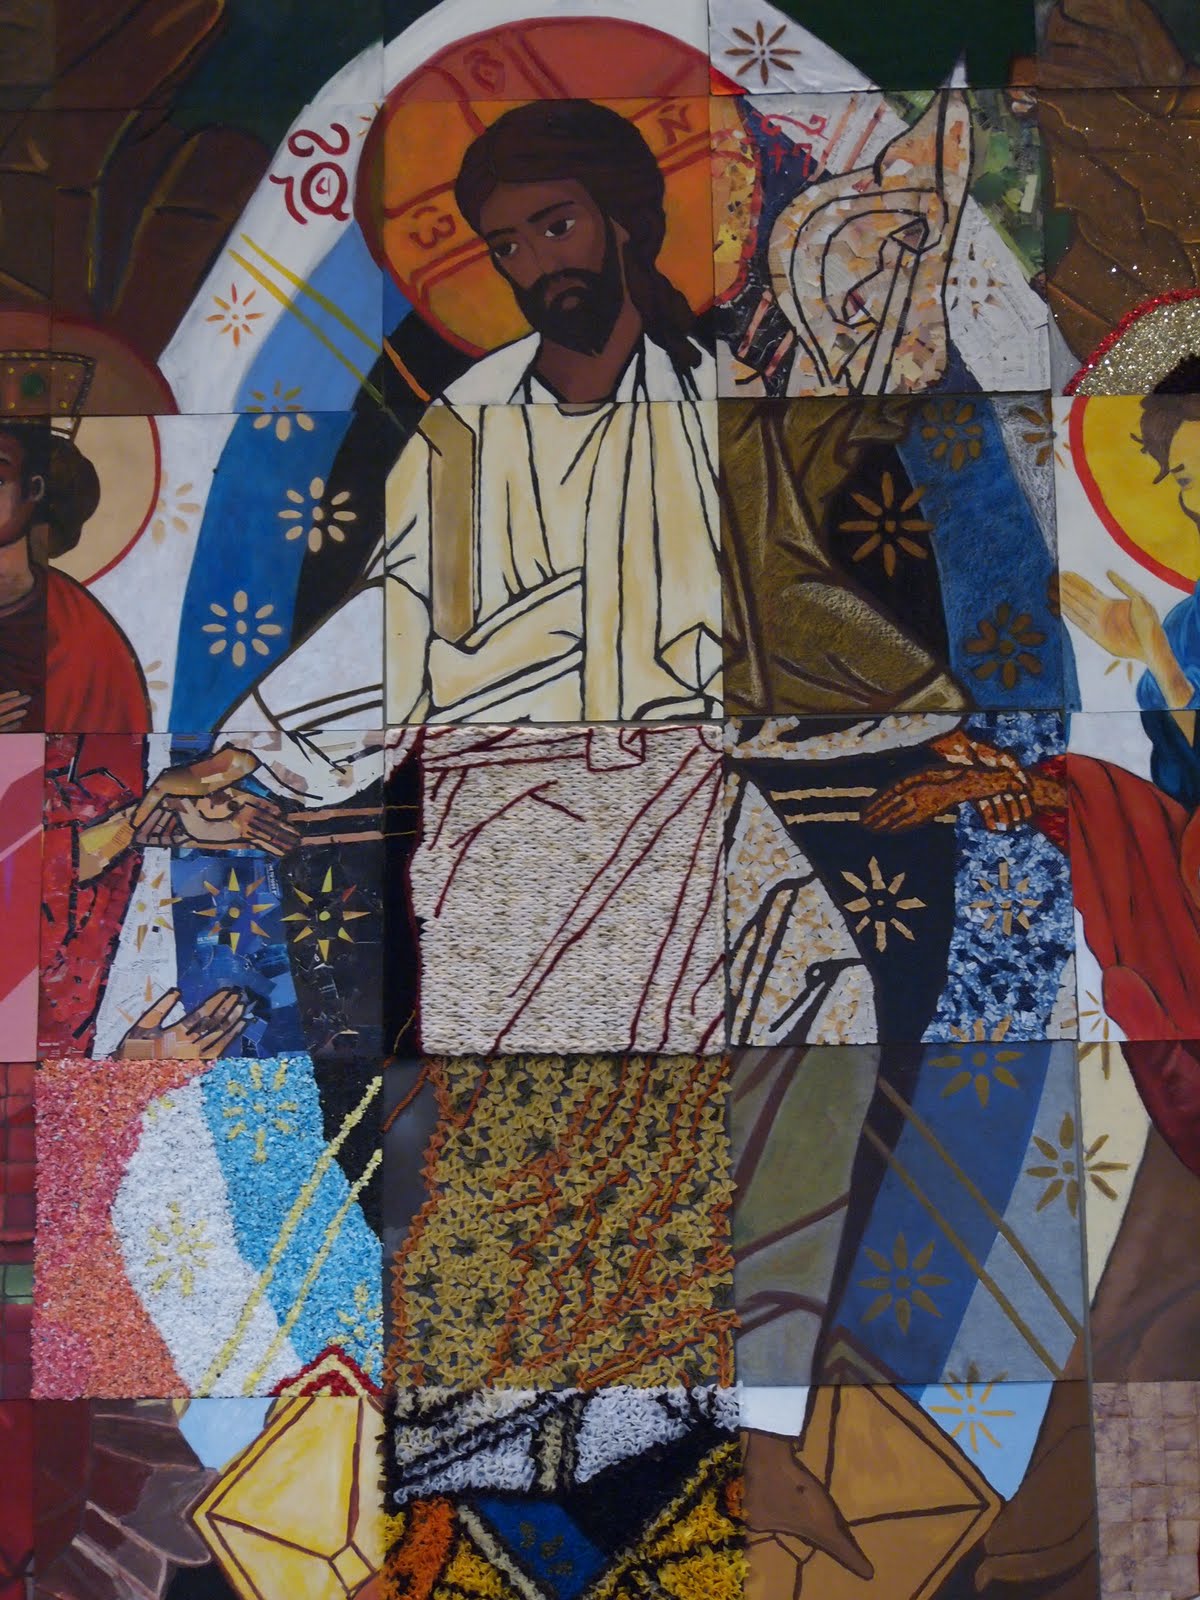
And what was the "painting" we were putting up? This icon:
which depicts the angels who visited Abraham, but in church tradition also represent the Trinity. (I don't have the details right now...I forgot to pick up the handout! I trust you'll excuse me as this is a crafting blog, not a theology blog.)

In any case, the painting was divided into 30 squares and we could pick up a copy of the square we wanted to do:
I picked a simpler one to make sure I would be able to get it done. You can see the copy has a grid printed on it to help us duplicate the design. We were also given a 24" square of tar paper:
I had decided to do a hooked rug of my square and since I didn't think the tar paper would hold up to all the holes that would take, I copied the shape onto a netting that I've had forever. I have no idea where I got it, but it was obviously a "hand me down" because there was a few inches of rug hooking done on the one end. I ruthlessly cut it off and had just the right size left for this project.
Once I had an outline, I added grid lines:
and then copied the outlines of the design with the help of the grid lines:
Then I started outlining the shapes with yarn. Rug hooking is traditionally done with narrow strips of wool fabric, but since I don't have any and didn't have an easy place to find some I went with yarn. With the picture in hand, Troy and I went to JoAnn's and shopped for appropriate colour approximations in the bulky weights. Some were wool, some acrylic. When I got home I found some stash yarn that would work for the blue colours so I ended up returning the blues I bought.
My first line in dark brown actually followed the wrong line, but I noticed it before going any further. The nice (and scary) thing about rug hooking is that pulling on the end quickly pulls out all your loops. There are worse things to undo.

When I had that fixed, I added more lines in the dark green:
With the outlines done, I started to fill in the rest:
Since this is netting, I just followed the holes and the yarn ends up in a grid pattern. I think rug hooking is usually done on a type of burlap and then you can give the solid areas texture by filling in the area with curved lines. But I was on a deadline, so I didn't mind not having to make those decisions. I just had to fill all the holes.

I was a little worried about something catching a loop or loose end and ripping everything out, so I covered the back with masking tape as I went:
It's not fool-proof, but I thought it would help enough.

I continued to fill in areas:
I was pleased I was able to work on this in the car as we drove to Missouri and back. By the end of the trip, all the hooking was done:
My original thought was to stick it to the tar paper with spray adhesive, but when I couldn't find the spray adhesive I decided that was probably overkill anyway. I put the tar paper on the back of the "rug", folded over the excess netting and taped it down with my fancy duct tape. (We somehow were out of regular duct tape.)
The masking tape was my "basting."

Here it is finished and "bound":
And this morning when I got to church, I got to see it on the wall:
Here is the whole thing:
A little closer:
Closer still:
I was distracted today and didn't get a chance to get a close look at the other squares. I will admit that I spent a lot of time studying them during the service and may have missed parts of the sermon...

The glitter one was very popular. I always like the ones done with ripped paper. The top right square of the right figure's halo was done with some very effective 3D effects. The halo looks like corrugated metal (but maybe it's stiff paper?), I think the hair is string and the top of the staff looked like a stick. And I think one of the squares in the very top row is done with tinted photographs. That idea occurred to me but I didn't know if I could do it. I hope to get a closer look next week.

I just love these projects. I also was reminded how much I enjoy rug hooking. I have had that scrap of netting to do a rug for years and now I wonder why I hadn't done it yet??? And the grid method of copying a picture is just so easy, it makes me think I could take a photograph and make a hooked rug hanging from it. I would love to take an "iconic" family picture (doesn't every family have those pictures we all know and have seen a hundred times?), simplify it, and hook a rug. And you know if I do, I'll tell you all about it!

Monday, April 25, 2011

Joyful Eastertide

Easter came and went without my getting up a post, but Eastertide has six more weeks. Plenty of time to enjoy our Easter installation at church.

You may recall that a painting was divided into 42 panels and each panel was taken by volunteers to be made to look like its part of the painting. We all knew it was up on the wall by the Wednesday before Easter, but it was covered by a veil.

No peeking during choir practice on Wednesday night.

No peeking during the Seder dinner on Thursday night.

No peeking during the Good Friday service...or the Easter vigil service on Saturday night...

And no peeking even on Sunday morning when we arrived. You could just feel the excitement in the pews as we all sat and waited.

We started the service in a dim room with the lights off and the windows shrouded. We heard the story that "while it was still dark," Mary went to the tomb and found it empty. How she ran to get the others. How Peter and "the other disciple" ran to the tomb and also found it empty, and then went back to their lodgings.

But Mary stayed and encounters Jesus, the risen Jesus, but does not recognize him, until he simply says her name, "Mary."

At that point, the lights came on and all the curtains and veils were pulled away. The sun cooperated nicely and shone so brightly it felt blinding after the dimness we had gotten used to. There was an audible reaction from the congregation as the "painting" was revealed:
Yes, a little hard to see, isn't it?

I'll give you a closer look:


That's ok, take your time. I'll wait for you to finish looking.
Takes a while to take it in, doesn't it? Believe me, no one was paying
attention to the service for a while either!!

Fabulous, isn't it?

And it really didn't matter who did what. There was a "map" available after the service, but that's just curiosity. The main thing is how all those very different parts come together. Some matching, some not, but in the whole just fantastic.

There were mini marshmallows (I kid you not):

There was glitter and pompoms (but who wouldn't want a glittery halo?) and pencil crayon:

There was pasta:
and lots of painted squares and fabric collages and paper collages and felt. I don't mean to single out the ones above as anything better or weirder than any others, but I had to pick a few to highlight as examples.

One thing I couldn't get over was how well all the lines in Jesus' robes lined up:
Ten different squares had to come together and they pretty much all line up. (A relief for me since mine is right in the middle!)

After the service, there was a crowd of people milling around on the platform trying to get a closer look. It was a really neat thing to be a part of. And after the service the party went on all day as people found time to Facebook about the event before, after and in between Easter get-togethers.

The whole piece is 11' x 14' and here's a pic to give you a sense of scale:
It is quite dominating. (In all the right ways.)

If you're curious about the image we started with, check out Tamara Rigishvili's work at her website.

Sunday, April 17, 2011

Art in Pieces (Two)

In my last post, I mentioned I was done the "brute knitting" for my knitted square of my church's Easter project. I did manage to get it spun out in the washing machine and pinned to shape before going to bed that night.

The gauge was a little hard to figure out because the yarn really liked to shrink in the vertical direction and spread in the horizontal. If I didn't stretch it out, the piece was only about half as long as it needed to be. But a little persuasion with some pins, and I had it to size:
By the next morning it was dry. I left it pinned to the carpet while I continued to work on it. (Although I figured it would help, I did not trust the blocking to make the piece actually hold its shape. The yarn content was very high in acrylic and only 20 percent wool. That's not enough for the blocking to really hold up.)

First thing to do this morning was get the grid marked on the fabric. Obviously, marking the board it would be mounted on wouldn't do me any good.
Instead, I took some cheap craft thread and ran strands from side to side and top to bottom to mark the grid, anchoring them with just a back stitch (no need for knots).

Then I cut strands of wool left over from my February Fitted Pullover and roughly laid out all the shaping lines that I was going to add with needle felting.

Then I started punching with the needle felter.
That took a lot of time. For one thing, with the piece lying on the floor, I couldn't punch straight down. I had to push it through at a steep angle. (Only hit my fingers twice. The warnings are right--the needles are very sharp.) For another, with the base fabric being primarily acrylic, it didn't take very well. But it took well enough, and with a little patience and careful working, I got the lines "drawn on."

A little more time and a break for brunch and I had the piece done! Only thing left to do then was to glue it on to the mounting board. A little work with the glue gun got that accomplished:
Again, here's the picture I was given for comparison:

The colour looks a little off, but I'm thinking with so many people doing this, it's going to vary from piece to piece anyway. (We'll see...)

The knitting itself was finished relatively quickly. I knew with scale of the project (24" square) and just a week to get it done that bulky was the way to go. I purchased a bulky cream colour (Wool-Ease Chunky Thick & Quick) and held it with two strands of a variegated chunky (Deborah Norville Serenity Chunky). I used the largest needles I had (US15).

After knitting seven or eight inches I realized that it was was too thick and would take too much yarn at that rate. I took it out to the first row and then reknit it wrapping the yarn around the needle twice for each stitch. That made for a much better fabric. (That's a good trick in general, btw, if you don't have big enough needles.)

The black was also the Wool-Ease Chunky. I thought holding two strands of it would equal the three other strands, but something was off. I don't know if I bought an even bulkier weight of the same yarn in cream (I no longer have the label to check) or if the black just isn't as thick, but two strands was not enough. I ended up Navajo plying one strand of the black as I went and that resulted in four strands being knitted at once. That seemed to do the trick. (ETA: I found the label for the cream yarn. It was "Thick & Quick" so I did buy the wrong weight in the black.)

Final post-blocking gauge? 6.5 sts and 4 rows per 4". That's huge!!

When I dropped off the squares at church this morning I took a minute to flip through the others that had been dropped off. Besides paintings, there were paper collages, fabric collages and construction paper cutouts. They were all really neat and I can't wait to see how the whole comes out. But I'll have to wait until next week (as will you)...

Friday, April 15, 2011

Art in Pieces (One)

Each change of the liturgical calendar brings a new installation at the front of our church. I've been involved in a few, although less so over the last couple years.

Last week, however, they announced that they would like the congregation to help with the Easter installation this year.

The idea was to put up a painting which would fill the front wall of the sanctuary. The plan was to "cut up" the painting into 42 sections and have people bring home a section and depict that part of the painting in whichever medium they preferred.

The pieces are due this Sunday--only one week after being handed out!! The people were aflutter after the service with the most common question being asked, "Are you taking a square?" The question I most often heard was, "Are you going to knit one?"

I ended up taking two squares home. (That was more common; don't be calling me an over achiever.) I had too many ideas to make just one!!

Quilting would have been fun, but I was worried about the one week deadline and finding fabrics to match etc. I've always liked working with paper and find it very comfortable, so I thought I would try that instead.

I first shopped around in a flurry assembling all the colours I needed for my square:

I then cut the tissue into squares and started gluing it down in little cup shapes.
I would wrap the tissue square around the end of the marker and then press it into the glue.

After an hour's work on Monday night, I tried to convince myself I maybe had 10 percent done:
Then I realized it would be very easy to check that. The instructions suggested drawing lines on the square to divide it into 10x10 sections. The drawing we were given was already gridded up in the same way. It made it much easier to transfer the design. So my board was divided into 100 squares. I only needed to count the covered ones to know how far I was.

And that was...5 percent, not 10. At that rate I had 19 more hours to go. That was not going to fly...

Instead of giving up, I changed the scale. I cut my squares twice as big and used a highlighter instead of a skinny marker.

That worked much better. Tuesday I put in about 3 hours and got about 30 percent done:

Wednesday I put in another hour after choir and got about 35 percent more done:

And Thursday, I finished it up with another few hours:

Here's the picture I was given so you can compare:
Not bad, right?

Although I could do without the time pressure (a little more notice next year, maybe, guys?), it was a lot of fun. I recently read Picture This by Lynda Barry and this project tied in very nicely.

It's a graphic novel that explores why people draw, what drawing can do for them and other related issues. She talks about a place drawing can take you. So you're not making a drawing (noun), you're drawing (verb). What comes out of it may not matter--what do you get out of the act of drawing?

The analogy she used in an interview was riding a bike. You can enjoy a bike ride purely for the action of biking around. But how would that change if when you got home, someone showed you a video of your ride and told you that you aren't good at riding a bike? Are you out riding a bike because it makes you feel good, or are you out there trying to produce the perfect bike ride?

Anyway the book is thought provoking and challenging. One exercise she tells you to do is to spend some time just drawing dots on a page. Fill the whole page with dots. It's not a "waste of time" if it helps you clear your mind, or process stuff. And that is basically what I did with this square. I filled it in with dots of tissue.

This evening there was a support group of sorts for people who wanted to get together to work on their squares. It was mostly directed at people who were painting and may want to share and borrow paint supplies. I wasn't painting, but I'm excited about the project and wanted to get in on the action.

We started with a nice informal potluck dinner. (Food is what makes it a party, after all.) Then people got to work:
Mother and daughters working on a square.

Another family working on a square.

Father and daughter each working on their own project.

And Ali working on her own square. She is a very confident painter--the girl knows her stuff!!

And what was I doing all this time besides eating and taking pictures? (Because I sure wasn't painting...)

I was knitting. Yes, I am knitting a square. I finished the brute knitting part of it this evening. In fact, I just realized it's still in the washing machine and I need to go down and pin it for blocking...gotta go!!

May I suggest?

I Say! or at least I did once...