Showing posts with label felting. Show all posts

Tuesday, June 3, 2014

Paper or Plastic? I'll Take Cashmere, Please.

I didn't expect to post anything more before I left, but I managed to fit in one more project...

I had been pondering what purse/bag to take on the trip because it needed to be big enough to carry a lot, small enough not to be bulky, comfortable, easy to carry, somewhat secure from sticky fingers...the list goes on. The one I preferred is this sad and sorry looking messenger bag:
I've had it since at least 1999 and it looks it! It's in good shape and not very worn but the fabric is faded and stained. But I couldn't let it go because I love how it works (all the pockets and spaces are perfect) and how it fits. It can hold a lot but still sits flat against my body.

So I've been thinking about adding a "skin" to freshen it up. Since it seemed to be the only good candidate to take on my trip and there was no way I was going to appear in all those vacation pictures with this sad thing, I decided to take action.

My thought was to cover it with a felted sweater. I could have used regular fabric but then I would have to deal with raw edges etc. The felt could just be cut and applied.

I went through my stash of sweaters and narrowed it down to these two options, both cashmere but not suitable for raveling:
Yes the zebra print is cashmere. (Who would do that to cashmere? Anyway...) I decided the argyle was more my style, plus it was already felted whereas the zebra print was not. If I had a chance to make this project move along a little faster, I was going to take it!

Next step was to make a pattern from the bag:
 1. Trace
2. Cut. Then draw a second line in from the edge the same width as the binding on the bag that I was going to leave visible and cut again.
 3. Test. Close enough was close enough as the felt has enough give.
4. Cut out the pieces from the sweater.

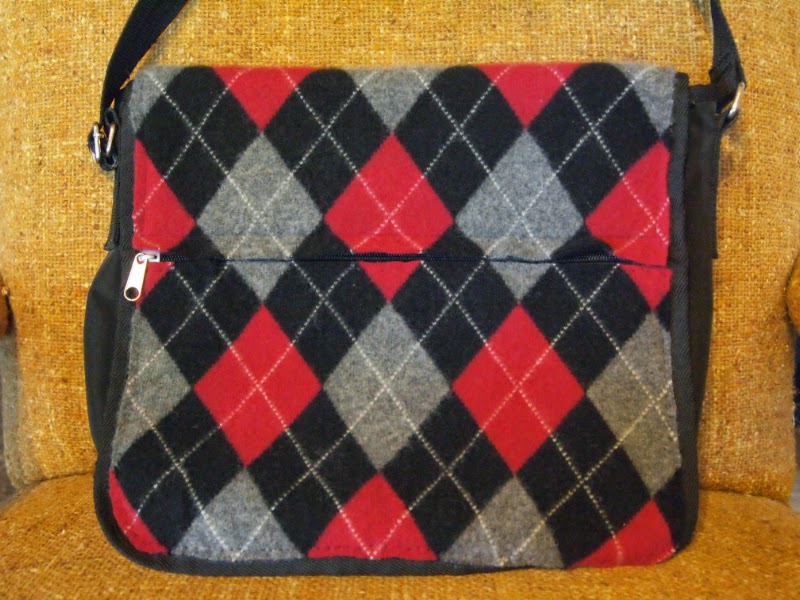
I carefully cut the pieces from the front so that the argyle would line up on the two pieces above and below the zipper.

The argyle pattern was only on the front of the sweater, so I ended up using some of the plain black from the back as well.

5. Sew in place. No pictures. I guess I was too busy stitching! I did a small section by machine where I could, but most of it was done by hand. I just took small stitches on the front so the thread wasn't visible.

And by the end of a couple hours, I had a new (looking) bag!
Front.
Back
Looking at the pictures I almost like the back better with its contrasting fabrics and started to regret I didn't do that on the front above and below the zipper. But oh well. It is done and I like it. The cashmere feels soft and warm against my skin. It is perhaps a bit "winterish" (in colour I mean) for a trip in June, but again, "oh well."

This is a project I've been meaning to do for a while so it feels really good to have accomplished it. I'll keep the pattern pieces so I could always change the look again if I want. (I suspect what's really going to happen is that I'm going to end up recreating the whole bag, but that is for another time.)

And I think I will have to do something about the aging strap...something woven in black and red diamonds I think...(but again, another time).

For the final touch, I added a little pull to the zipper:
Now all I have to do is fill it with everything I need for the trip!!

Tuesday, December 11, 2012

Little Gifts: Part 2

Now that you have boxes to wrap your little gifts, what will you give? What I put together were a bunch of phone/MP3 player covers made out of felted wool sweaters.

Although I didn't take a lot of pictures of the process, I think if you have an inclination to do it, it will be easy to figure out.

I used two felting tools (pictured below). The one on the left is really just for fine details and only has three needles. I added the one on the right to my toolbox for this project. It has six needles and works on a larger area at once.

They make felting machines as well. They're a lot like sewing machines in looks, but do not have a bobbin or any thread at all, in fact. And instead of one needle, they have up to twelve needles going at once. I've seen them on TV shows, and they can really cover a lot of area fast! But meanwhile I made do with my hand tools.
You'll also need a type of brush to put under the fabric. It gives the needles space to extend under the working fabric. You can buy them, but I was too cheap for the $20 item, so I used a brush intended for use in the shower that I never used. It worked well enough, but I should warn you that using a brush this way will ruin it for any other use. It will get filled with wool lint.

For most of the covers, I started with sleeves cut off of sweaters that I had felted. This gave me plenty of width and also provided a nice rib for the top edge. I cut one seam so I could work on them flat, and then sewed the bottom and one side to make them the size I wanted.

First up, I made this from a cashmere sweater sleeve:
My sister mentioned she needed a pouch to carry her cel phone while walking the woods with her family. That inspired me to make the tree. I cut little strips for the trunk and each branch, laid them in place and just started punching with the needle felter. I got this much done by the time she visited, but I left it up to her to attach a string to be able to wear it around her neck.

Next up is this monogrammed design:
I used separate thin strips for the letter that I curved as I went. I thought it would be easier than trying to cut out the letter in one piece and keeping it in the right shape as I worked.

Some simple stripes that continue from the front to the back:
A fanciful flower:
This red did not felt very well. (You can tell that the edges are pulling up from the base fabric a little.) Taught me that not all wools are equal.

Next is this one:
I cut out what I thought were random shapes, but it ended up looking very much like an egg.

I made it from smaller pieces that I sewed together--the front red, the back pink.
And then I sewed on a piece of ribbing from another sweater for the top.

And finally, this cartoonish character:
I think the idea was planted by some quilts I've seen of this type of fanciful self-portrait style.

Here's the collection:

Sunday, April 4, 2010

Happy Easter!

I've been having some fun preparing for Easter. Another little break when I couldn't concentrate on the Whistler sweater.

I also had some fun with the photo shoot. Troy had conveniently just brought me a bouquet of pink tulips when I was ready to take the pictures.

I bought the pattern for these eggs last year already knowing I would have leftovers from my 2009 afghan to use. Yes, I probably could have figured out my own pattern for the egg shape, but the pattern was right there and it's so easy to just follow directions! Plus it was nice to have something to look at to stimulate some embellishment ideas.

Although the project was pretty quick, it did not happen all at once. It was a few weeks ago that I knit them up over a couple days, in minutes stolen here or there, and at the end of the day when I couldn't concentrate on anything more complicated.Project Stats
Started: 22 Mar 10
Finished: 27 Mar 10
Pattern: Woolly Eggs by Marie Mayhew ($6)
Materials: Malabrigo leftovers from my 2009 RP afghan; buttons on hand


Then came the felting. While I was at it, I threw in a few sweaters I have sitting around waiting for the right time. I probably could have felted the eggs a little more but they're ok. (It's hard to tell how felted it is when it's sopping wet.)

A few days later, I finally got to the stuffing and embellishing. The most fun, I have to say, but also the most fiddly.
From top left, we have a striped egg--but they're not just any stripes. I used a helix striping technique I'd recently read about. You can see in the detail pic to the right that the colours literally spiral. There's no jog from doing one colour followed by another. The colours are all worked at the same time, stacked on top of each other like interlocked spirals. This egg was fun little project to practice the technique.

In the middle top, I knit stripes and then used buttons for flower blossoms. The stems and leaves are needle felted. (More on that in a minute.)

Top right is a small plain robin blue egg. So simple, and yet it might be my favourite!

Bottom left has a knit stripe and borders done with needle felting.

Bottom middle is a plain egg in hollyhock dressed up with swirls and dots of needle felting. (Also in the running for my favourite!)

And bottom right is a speckled egg, done by knitting with two colours held together--the taupe Malabrigo and a bit of the thin green wool rescued from this vest. Again, very simple, but a great effect nonetheless.

And then there is this egg:
I abandoned the pattern and tried knitting an egg in the other direction to make vertical stripes easier. I used short rows for the shaping, and it worked pretty well...except I cast on too many to start. So it's more like a torpedo egg. And then I embroidered it with the feather stitch, carefully placing each colour opposite its knitted section.

Oh yeah...I did one more too. I could call it my measles egg. I knit it in orange and then duplicate stitched some red dots on it.
They didn't stand out very well after felting, so I thought I'd outline them. I pulled out my new toy, a pen style needle felter. This model has three needles for fine work. Each needle is barbed so that it grabs material on the way down and pushes it through lower layers. You set the wool where you want it and just start punching through it. (Keep fingers at a safe distance!)
In the above pic, you can see one dot done on the left, and I'm working on another. The outline didn't end up helping a lot with defining the polka dots, but it was worth a try. It did, at least, add a little texture to the egg.
I had been curious about needle felting for a while now. I wasn't sure if it would be like other embroidery and embellishments for me: ok, but not especially enjoyable. But I have to say that I really liked it. It certainly is easy and fast, and you have a good amount of control. I'll be pulling that needle felting pen out more often when I want to dress something up!

And now I'll leave you with a picture containing just about every Easter cliche I could think of!
As a side note, I'm not normally a stuffed toy person, but I am oddly attached to these two bunnies. They were gifts from two different people the same year and are good representations of our bunnies, (the late) Chocolate and (the still going) Red. (And when you squeeze their front paws, they cluck like chickens!)

Hope you all have a happy Easter!


PS: Last night I finished the second sleeve on my Whistler! Woo hoo!

Sunday, October 25, 2009

Weekend Projects

I started two different little projects this weekend.

First of all, I sorted through my "felting" sweaters that have been sitting around in my laundry room for quite a while. I found one cotton shirt which I obviously bought to wear since there's no way to felt it. So off it went to the laundry.

And I sorted out another sweater that I can't imagine why I would want to felt:
It was a little thick and heavy already, so would only get stiffer with felting. Plus, it's 15% nylon which is a little high for felting. (But just about right for socks!) So I raveled it.

Well, I should admit that I started to ravel it. I got the seams picked apart which is no small feat in itself. And I got the front done and wrapped into a skein (344 meters). But the back is just started and the sleeves are still waiting.
I'm lucky my honey puts up with projects like this sitting on the couch for days. (I do try to keep the chair empty for him.)

As for the felting, there were a high percentage of sweaters with buttons on them. (Part of why they're being felted instead of raveled--the front of a cardigan is generally cut and sewn down the button edges and you don't get one continuous length of yarn.)

I dutifully cut off all the buttons to save for some other garment or project:
I really like the big burgundy ones. Sadly there were only two of them.

Here is a sampling of the sweaters I was doing:
Wouldn't that be a nice combination? I love it. The striped one was, unfortunately, overfelted and is now very stiff and thick. I might still use it; we'll see.

I did more sweaters but you'll have to wait to see the results. Right now I'm figuring on cutting them into squares and sewing up baby blankets; they could be really cute.

Friday, July 24, 2009

Shop Til You Drop

Clures and I have been doing our part to support the local economy over the last two days. We have visited numerous local quilt shops (I can not believe how many there are!) and a yarn shop.

It seems like most of the shops are owned by friends of Clures and I’ve met some very nice people!

I have also made a few good finds. I bought the following fabric for an as-yet unstarted twin quilt for a friend’s son who will graduate from high school one of these years. (That’s when I plan to give it to him.)
Top: Cityscape fabric (2 3/8 yds for sale at $4.99/yd) at Linda’s Cottonpatch which I plan to use for a backing fabric. Landmarks from cities around the world are suitable for a high school graduate, don’t you think?

Middle: Light print for alternating blocks at Judy’s A Little Bit Country Fabric Shoppe. (4 yds at $4.50/yd—unbelievably, that’s the regular price!)

Bottom: Fat quarters mostly from D&T Quilt Shop (on sale for $1 each)

I didn’t have the pattern with me so I took some guesses at amounts and just bought enough fat quarters to get me started.

I also found a perfect backing fabric for my Hawaiian star quilt at D&T Quilt Shop. Looking through the wide backing fabrics, a bright red caught my eye first. But after a little more looking I found this lovely blue paisley and it won out in the end. Three yards gives me a piece that is 110” by 108” and that should work for the quilt which will end up about 96” square.

A lot of the collections of backing fabrics I see in stores are very conservative (or dare I say, boring?) and I wasn’t going to wait to snatch this stuff up. And not to make it all about price, but at $8/yd it’s not really a hard choice to make.

I did not find anything to buy at the knit shop. They had a lot of cottons which I’m not really interested in right now; a lot of silks which I can’t really afford to buy just because it’s pretty (and feels like…well, like silk…mmmm); and a lot of big name brands which I’m not too inclined to buy. But I enjoyed looking around and appreciated Clures’ patience as she indulged me.

During all this shopping, I have been diligently knitting away on my Christmas surprise like a good little girl. I got one unit done on Thursday and another one done today! Woo hoo. (And yes that is authentic bug splat on the window.)
I am almost out of this blue and I will miss it. It makes me happy. There are colours that I am attracted to and love (such as red), some that get me excited (purples, yellows) but blue is the only one that can make me happy. I had a paint colour in my previous bedroom that did the same thing. That is a good colour to have in a bedroom. But anyway, I’m running out of the blue yarn and will have to make do.

Another bonus find at a late-day yard sale stop was two wool sweaters. The first was a black GAP sweater that is too small to wear, but never too small to felt:

And the second was a bright neon yellow sweater which someone has already started to felt [full] for me. (I suspect that’s why it was offered at a yard sale.):
Don’t let this picture fool you--the actual sweater is even brighter. I have two big bags of sweaters to felt already, but I liked these enough to buy and add to the pile. One day I’ll full them all, cut ’em up and go to town making pillows, bags, camera covers, and patchwork blankets. Can’t wait til that inspiration hits!

All for now!

Tuesday, February 3, 2009

Full of Wool

I was going to wait to share this news until I had actually done something with these items, but I couldn't wait.

Let me back up.

Saturday I was doing some things after working in the morning, and was going to do my long-overdue groceries just before heading home. But pulling into the parking lot, I couldn't help but notice that it was extremely busy. Extremely. Oh! it's the day before the Superbowl. I decided no lack of food could make me go into the store that day. I then saw that right next door was an equally busy Goodwill store...but it had 50% off going for it. For that, I can brave the crowds.

I made quite a haul. I found wool sweater after wool sweater that was begging to go home with me. Some days there's nothing but ramie or acrylic blends, but not today. I bought most of them for fulling (the correct term for "felting" an already knit item).

Let's start with this shocking pink number: It's 70% lambswool, 20% angora, and 10% nylon (for strength), from "Lady Sansabelt" (which means nothing to me).
The colour attracted me right away. It is even more shocking in person, but it's quite a true pink. After fulling, I will probably cut it up and use it with other pieces so I got it for the punch it could give to other fabrics.


It was also a prime candidate for fulling because it has several noticeable holes (tsk tsk to the person who didn't care for it properly) and some colour damage on the back (probably from bleach?) which will not be noticeable after the fulling. Perfect!


This next number was desirable for its beautiful fair isle pattern and its sheer size.
The colours are not anything I'd wear, but I'm thinking maybe a throw pillow, or possibly a tote. (Could I possibly use another tote?! Maybe...) This one is from Eddie Bauer and is 100% wool. Should full like a dream.

The next item is what I would call a hideous sweater. From Sag Harbour. (Need I say more?) Also 100% wool. What it has in its favour is a consistent colour and being an XL, it offers a lot of fabric!
It would be the perfect counterpoint to the following huge item:
This almost-knee length sweater coat is actually quite nice. I tried it on when I got home to see if I wanted to wear it a while before fulling it. But it's not very comfortable. So into the washer it will go. The light flecks you see are the very shade of pink of the above sweater. Could things get any better than that? I'm thinking of cutting them into squares and sewing the squares together with edges abutting (but not overlapping). It should work. And then I could line it with flannel in case the lucky recipient baby's parents are worried about the babe's reaction to wool. This item was from Stitchworks and is 66% wool, 20% mohair and 14% polyester.

The next item could be felted (American Eagle, 100% Shetland Wool) but I think I will try to unravel it instead. That is a whole other adventure in reinventing Goodwill finds. The wool is very fine and a little course so I think it would be perfect for my second pair of socks. (The first were more than two decades ago--do I still have to count them?)
And of course, the original reuse of Goodwill items still applies: I have added this same vest in red to my wardrobe. The red one was in a little better shape (not as stretched out) and of course fits into my wardrobe a little better. (I love the red.) I'll let you know how the unravelling goes.

I bought one more sweater, but it has already been unravelled. I will post some process pics soon. With the sale, all the sweaters were $2.50--even the big sweater coat. At that price, I think they are worth buying just for the possibility that I might do something with them. Or just the practice to get better at fulling. It sounds so easy when someone who's done a lot rattles off the steps. But I've learned there's always a lot more to learn than you might think!

Happy with the bargains and the possibilities they bring,
christina

May I suggest?

I Say! or at least I did once...