 |
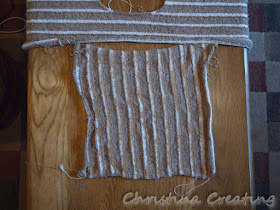
| Gauge swatch. The gauge didn't match the pattern but it was what worked for this yarn so I resigned myself to recalculating all the stitch counts in the pattern. |
My "now" pattern was the pink and black cowl from the Winter 2017/18 issue. I started it in January and finished in April.
I knew pretty early that my "then" pattern was going to be a striped blouse from a 1984 issue but I didn't have any idea what yarn to use.
I wanted something drapey, probably silk. And as usual, I was hoping to get the yarn from a second hand sweater. I couldn't find anything. I purchased a couple sweaters from other unravelers online to try, but they weren't well suited either. (Too thin or wrong colour.)
I looked a little further in the stash and decided a white silk I bought from colourmart.com would work with a tan rayon/linen blend from this sweater. Because I had less white than tan, I figured I had to switch the main colour from white to tan. That was probably better for my colouring anyway.
I knit up a swatch at the end of December to technically meet the knit-along requirement to start the project in 2018. The group is pretty relaxed anyway. I mean, it's not like they won't want to see a finished project just because it was late or that we're competing for cash prizes! :)
After all the calculations for gauge and size, it didn't really look like I had enough yarn, but it seemed to me like I should. Normally ignoring the math for a feeling isn't advisable, but yardage numbers aren't always reliable. So, I started anyway. (Spoiler alert - it's going to be fine.)
The blouse has an interesting construction. The front and back panels are knit side to side, and those are the pieces done first. Besides recalculating stitch counts for gauge, the only change I made was to finish the shaping with short rows instead of casting off stitches over a series of rows.
 |
| Along the sides, the top and bottom are knit a little wider to give waist shaping. |
The next piece is a monster. The yoke and sleeves are knit in one piece that stretches from the cuff of one sleeve to the cuff of the other. Over 300 stitches and each row took a while.
 |
| With this many stitches, I had to work on a circular needle. I switched back to my straight bamboos after I split for the neck. |
Fortunately that was when I was working on just one side of the neck, so the rows were only about 140 stitches, not 300.
As I got close to finishing the second shoulder, I noticed I had dropped a stitch far below.
I was not eager to rip all the way back. I thought about just sewing the stitch in place, but didn't like that idea other. So I dropped the stitch beside it all the way down too, and then "knit" them both back up. Dropping the extra stitch gives you a little more slack in the yarn to even out the tightness over two stitches. With a final blocking I don't think it will ever be noticeable.
I was happy to finish this massive piece:
I think the neck hole is obvious. The slit will go in the back and be closed up with three buttons. (So vintage, right?) The left and right sides, will curl into tubes and form the sleeves.
Here's the front panel in position below the yoke to give you a bit of an idea (and give me a little motivation that this is actually coming together):
The piece I'm working on now is one of the cuffs:
 |
| The cuff in progress under the end of the sleeve. |
After that, I only have to knit two pieces for the collar. It's nice to be knitting these small portable pieces. I'm looking forward to having this together. I should be able to wear it even in warmer weather so I won't have to wait until next winter to wear it! :)


No comments:
Post a Comment
Comments are moderated so you will not see yours post right away. Thank you for leaving a comment; I enjoy reading each one!