I still enjoy seeing chevrons, zig zags and jagged stripes on all articles of clothing and it occurred to me that babies should not be left out.
On top of that, the shape lent itself very well to the function of the bib. The concave part of the chevron nicely fits around the neck and the angle means there is no additional shaping needed for the straps to conveniently meet at the back.
Recently I knit up a new version, which turned out very nicely:
I worked with 4mm needles (US 6), but use what you need to get a firm fabric.
Cast on 61 sts. S1, knit remaining stitches S1, Kfb, K26, K2tog, (place marker if desired,) K1, SSK, K26, Kfb, K1 Repeat last two rows, changing colours as desired for stripes. (See notes below.) When piece is 7” point to point, begin straps: Knit 11, cast off to last 11 sts, K11. (See tutorial below.) Work garter stitch strap on one side until it is 4” long. (Continue to slip the first stitch to maintain the selvage edge.) Cast off. Rejoin yarn and make second strap to match. When you have 2 or 3 rows to go, make a buttonhole on a row that starts on the neck edge by S1, K1, YO, K2tog, K7. Work 2 or 3 more rows as needed. Cast off. |
Notes:
Slip stitches: All slip stitches are done purlwise. This is the default unless a pattern states otherwise.
When changing colours, I find the colour transition looks better if you knit to the last stitch of the row with the old colour and then knit the last stitch with the new colour. (Details: With one stitch left on the row, move the working strand to the front (between the needles). Carry the new colour to the back of the work and knit the last stitch. You are now ready to knit the next row in the new colour. (Slip first stitch, etc.))
As you work wider stripes, be sure to carry the colour you are not using up the back of the work so there will not be long loops. I found it easiest to twist the working yarn around the non-working yarn between the first and second stitches at the beginning of the row. (And in this case you are only wrapping the non-working yarn on every other row.)
I like to make my straps two-at-a-time by using both ends of the ball, but you can do them one at a time too, if you prefer.
If you don’t want to use a button, then skip the buttonhole and crochet a chain from the last stitch left at the end of the cast off row to make ties. In this case, make sure to start the cast off row on the outside edge (not the neck edge) of the strap.
Tip for avoiding that dreadful gap between the strap and neckline.
I don't know about you, but when I cast off stitches in the middle of a row for a neckline, I always end up with an ugly gap where I start the cast off. Sometimes I can sew it shut while working in the ends, but it never looks good. While working on these bibs, I discovered ("unvented" more likely) a way to solve the problem. It only takes one extra step and then you're done!
Follow the directions under each picture:
 |
| Here I have knit the 11 stitches for the right strap and am ready to start casting off the middle stitches. |
 |
| Insert the left needle between the last two stitches on the right needle. You are going to "knit" a stitch between those two stitches, by wrapping the yarn around the left needle (as shown above)... |
 |
| ...and then pulling the yarn between the stitches with your left needle to form a new stitch on your left needle. |
 |
| Pull on this new stitch until it is large enough to put over the tip of the right needle. Remove the left needle and pull on the yarn so the stitch is snug (but not tight). |
 |
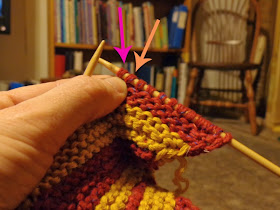
| Here you have the new stitch (pink arrow) next to the last stitch of the strap (orange arrow). You are now ready to start casting off. |
 |
| Knit the next stitch on the left needle like normal. This will be the first stitch to be cast off. (The pink and orange arrows are repeated to give context.) |
 |
| Now pass the stitch marked by the pink arrow over the stitch you just knit. This will anchor the cast off stitches to the strap. Now continue to cast off normally--knit 1, pass last stitch over, etc. |
Please post comments or send pictures if you make any bibs using this recipe. Enjoy!


No comments:
Post a Comment
Comments are moderated so you will not see yours post right away. Thank you for leaving a comment; I enjoy reading each one!