Patterns and Tutorials

Saturday, April 27, 2013

AIDS Walk Prize: A Billed Cap

I just got home from walking the Michiana AIDS Walk. It was a great walk, and we could not have had better weather. They moved the walk downtown this year and I liked that a lot.

For the last few years, I have knit a prize to give out to one of my sponsors (click to see the 2012, 2011, and 2010 prizes). I was a little stuck this year for what to make because I like it to be fairly generic and useful and easy to do while walking. That is a taller order than you might think!

In pattern surfing on Ravelry, I came across this hat and decided that it would do, except for the "easy to do while walking." I actually finished the hat well before the Walk, and worked on my current dishcloth while walking.
Coming up to the crowd at the Park.
And who is the winner this year? It is Mary who has been a long time supporter and surely deserves to win! (But don't all my sponsors. I know, sorry you couldn't all win it.) I have to admit I don't think I've ever seen Mary in a hat, but I hope she likes it or finds someone to gift it to who will. :)

Along the route of the Walk, they took us by the AIDS Ministries/AIDS Assist office where we could see part of the AIDS Quilt.
Have you heard of this project? There's a great movie, Common Threads, about how it got started if you're interested.
Each individual panel is 3'x6' (the size of a human grave) and is made by family or friends of someone who has died. The panel is sent in and they sew them into 12' square panels, fitting together the pieces so that they all face the right way.
This was the most traditionally quilted piece
I saw. The squares look quite old, so they
could be grandma's old orphan blocks, or this
square may have seen some hard use since
it was made.
The quilt has been displayed in its entirety only three times, and that was on the Mall in Washington, DC. I'm quite sure it is far too big now to be shown in one place. Parts of it travel all over the place to raise awareness. I was involved when it came to Big Rapids, Michigan, when I was in college there. It's always an interesting and moving thing to see.

Now, about the hat: The pattern was very good. It started at the bottom and I used a version of a provisional cast on that I use for double knitting. (The video is here; yes, the one pranked by reddit.) But of course, instead of using two colours, I just used two strands of red. This time I also remembered to use one size smaller needle for the cast on because I have done this before and found it a little loose. I followed that with one row of K1, P1 (on the regular size needles) and then started the actual pattern in the round. It was a perfect stretchy, but not sloppy, cast on. (And has the nice perk of being almost undetectable!)
The hat continues in alternating panels of garter stitch and cables.

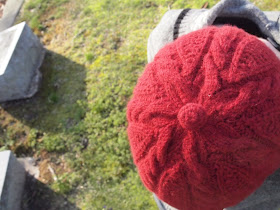
When it's time for decreasing, the garter stitch panels fade away and leave the cables to swirl together at the top:
It's all finished with the best little crocheted button:
(Much softer than a regular button with a shank on it!)

And then the hat is finished with a bill:
It's knit from picked up stitches along the edge, and then doubled on itself back to the edge for cast off. The double layer of wool gives a nice amount of body to the bill without being too stiff.
I made the hat from a wool/angora blend that I had raveled from a sweater.

Project Stats
Started
: 10 Apr '13
Finished: 14 Apr '13
Pattern: Birdie Hat by Suzanne Frary
Materials: 49 grams of wool blend from an Eddie Bauer sweater (67% lambswool, 19% angora, 14% nylon)

Wednesday, April 17, 2013

New (Quick?) Project

Last weekend I made some progress on a project I've had in mind for a while. I think I actually got the idea from a haunted house volunteer who wants to do a similar project for my boss, but I shamelessly took the idea to make for one of the students that works for us. She is headed to college this coming fall and has a busy summer, so we might not see her much. That means "good-bye" day is coming all too soon.

Usually we have a farewell lunch for departing students sometime before they leave, and I wanted to make a gift for her--a "tshirt" quilt made out of the haunted house tshirts. (We have a new one each year, in a new colour, that is handed out to the volunteers at the end of the season.)

It's standard practice to turn in any shirts you're "done with" to the office. The idea is that they "stay in the family" and not be sold at yard sales or given to second hand stores. Every year at the wrap-up pizza party, we put them out so that volunteers can take them if they want.

A coworker brought in several from her daughters in nice colours and I snatched them up for my project. I supplemented them with a few from our overstock and came up with a plan:

The squares will finish at 13" and this should make
a nice "throw" size quilt.
Last weekend I finished backing and cutting out all the squares. The shirts have designs on the front and back so I get a lot of fabric from one shirt. Since tshirts are made from knit fabrics which are too stretchy to just sew together, they have to be backed with stabilizer or interfacing.

For the first batch, I used some applique fusible that I had lying around, but I've since realized that might become a problem. It's fusible on both sides, so if I ever hit them with an iron now, the squares are going to stick to whatever they're sitting on. If I avoid that while getting the quilt together, then there's still a possibility that they will get ironed to the batting after the quilt is assembled. Not so bad if everything's all smooth and lined up, but if the quilt were wrinkled, it could really wreck it.

I've thought about prophylactically ironing those squares to the batting, but I think that will make the quilt really stiff. I think I'm going to leave it, make sure to put "Do not iron" on the label, and take my chances. (I mean, what are the chances that a college student is going to own an iron, let alone use it on a quilt?)

The second batch of squares, done after I ran out of the applique fusible was treated with regular light-weight iron on interfacing. They should be no problem.

The quilt also contains a little joke. See the left white square? It's got a different design and is dated much earlier than the rest. Well, every year at the pizza party my boss makes a big to-do about who has the oldest tshirt. He promises a cruise to the person with the oldest shirt. He starts calling out recent years, and then goes further and further back until it's down to one of the other Board members and him. And he knows his shirt is one year older than the other Board member's.

About the second year I saw this performance, I said to my coworkers that we need to talk to the printers and get an older shirt made up to show him up. This year one of them took my words to heart and had the printers make up a few shirts for us to wear with the original logo on them. No one knew the exact year that the haunted house started, but they picked something close and went with it. We surprised my boss at the party when we all beat him by more than a decade:
We're still waiting for the cruise. My boss keeps calling us all "big cheaters" while I am sticking to my story that I found them at Goodwill.

Tuesday, April 9, 2013

Swirling and Twirling and Fading Out

Allow me to talk about my Agate Socks before they are finished, paraded, and then dismissed from this blog forever. Last time I mentioned them, it was to say that I had to completely rip them back. I did so with much bravery and forbearance. And we are both much better for having done so.

I changed the way I do my short row toes, and I get a much rounder toe, which I like a lot:
The pointier toes fit well enough because knitting is stretchy and forgiving for the most part. But off the foot, they look rather anti-anatomical.

The other thing to note on the picture above is the delightful swirly pattern I was getting on the sock. The first version just had random thin stripes and was rather boring. When I started over, I increased the number of stitches and apparently hit just the right number for a candy cane effect. Until it wasn't:
This is the next section of the sock, right above the swirls, with the same number of stitches. Boring thin stripes again. This confused me for a while because if a certain number of stitches produces a pattern with a set dye pattern, then it should continue. Until it struck me that the dye pattern was changing.

You may recall that this yarn came wrapped on a spool, two strands together, and it was dyed that way so the two strands would be identical. Well wrapping out from a central core makes each pass around longer. And if you dyed a quarter of the circle red and a quarter orange, etc, each part of the "quarter" was shorter in the center and longer on the outside. And this all meant that even if you found a perfect pattern for some part of the skein, it wouldn't work later in the skein. And then I stopped worrying about it. (But it was nice to know why.)

Continuing up the sock, when I started to do the gusset increases, the pattern changed again:
and this is where it most resembles the agate pattern promised by the picture on the label.

Through the heel it was all stripey again, and above the heel, I got some aggressive flashing:
From there the sock went into some stripes again, and then a little more flashing before muddying up in the ribbing:
At the top layer of flashing and into the ribbing, you can really see that the dye had exhausted itself before getting into that part of the skein. The rest of the colours are so great, it really is a shame that they fade into this drabbiness. ... I just spent some time looking for the previous post where I talked about this so I could link to it, and it looks like I haven't talked about this yet. Well, let me get started! ...

My original plan--a set up to knit directly from the spool,
knitting the socks two at time. I could use both strands
at once and not have to re-skein the yarn.
When I frogged these socks because they didn't fit, I had to give up on my plan to knit from the spool, knitting up both strands at the same time. I had way too much raveled yarn to be able to deal with that.

So I wound them into two balls, like you were supposed to do. This meant I got to the inside of the spool for the first time, and I discovered that the dye did not get that far--the center of the ball was barely dyed at all. It's a yucky grey non-colour. Very disappointing.

You can see here the different between the "outside" and the "inside" of the ball:
 I know it looks like there's a big bright light on the right, but that's just the yarn fading out.

Here's a shot of the two skeins, wrapped in opposite directions so that one has the dye on the outside, and one on the inside:
What a difference, eh?

Although I made a point to comment about the yarn on its Ravelry page (I've heard nothing back from its makers), I've put on my perspectacles and am aware of and content with the fact that this is not really a big deal. With the colour fading out as it makes it way to the cuff, there's a really, really small chance that anyone will ever notice.

Of course, if I only did things so that people would notice, I wouldn't be making socks, now would I?

You can tell from the last sock picture, that I am very close to being done. When I got my Mock Monkey socks done, these ones graduated to the car and became my main "travel knitting." They've had a lot of attention on the way to church, at small group, etc, and are just about finished. They fit perfectly now, by the way, so I am really looking forward to wearing them.

And then Troy's Anniversary socks can move into their place. I feel bad that I haven't worked on them since our trip. (!!) Part of the problem was that he had to try them on, and to do that I had to take the stitches off the needles and put them onto a piece of yarn. But we've taken care of that, they fit great and now I am set to continue knitting them (once I get this pair done).

Clickety-clack!

Monday, April 1, 2013

Bias Scarf 2 (This Time it's All Mine)

Here's another little project. I finished it sometime before our trip but didn't have time to photograph it. Time, and I didn't feel up to setting up the tripod in the snow, etc. So I threw it in the suitcase and stood in front of some mountains.

This is the second time I've made this asymmetric bias scarf-ette. The first one was given away, and I had a day when I realized I intensely wanted one of my own. (I had an outfit on that it would look great with; of course, now I can't remember what the outfit was! But it will come back to me.)

The original was in a linen/cotton blend, which isn't really my cup of tea. It is a perfectly good blend, but I love my wools and silks.

Imagine my delight then, when I found the same colours (or close enough) in a wool/silk blend at Red Purl. I pounced!

I gave the scarf a light blocking:
I didn't really want to forced it to be flat and smooth--what's the point of knitting in all that texture if you're just going to torture it out of it? I did pin it to hold the edges smooth, but didn't stretch it out. And as I suspected, it's gaining more texture the further in memory the blocking gets. Which is fine with me.

Last time I modeled other ways you can wear this little scarf, but today I'll just give you the two basics, long:
If you can fix red eye with the click of a
button, where's the "shut eye" button??
and doubled:
Project Stats
Started
: 28 Dec '12
Finished: 1 Feb '13
Pattern: Rollercoaster Triangle by Birgit Schneggart
Materials: Handmaiden Fine Yarn Mini Maiden, unknown colour ($38) held double
I wore it one day on vacation and we ended up in a museum for most of an afternoon. The scarf was a little warm (yes, even I get too warm sometimes), and so I tied it around my hips like some women do. I didn't think I was one of those women, but I have to say it worked. Perhaps one day I'll even try it when I don't have a sweater and a coat to hide it. :)

Oh here...I found a picture so you can sort of see what I mean:
We're up in the Calgary Tower, standing on
the "glass" floor. It's unnerving, but fun!
With a different outfit, that might not be too bad, right? And in any case, it's easier than carrying your scarf in your pocket when you don't want to be wearing it.

For comparison, here is a shot of the first scarf in linen and cotton:
and here's the wool/silk blend:
Pretty close, right? I'm still delighted by the cool blue-greys mixed with the warm orange, and both with shots of yellow. Love. It.

And now, are we done with the vacation shots and finished projects? I think we are. :( sad faces all around