Patterns and Tutorials

Saturday, November 27, 2010

Kaffe Fassett Quilt Progress Update

I was determined to make time to quilt over this long weekend. Thursday was a write-off between church and dinner. (And they were both well worth it; don't get me wrong.) And the same is more or less true of Sunday. But I figured Friday and Saturday--they could be designated quilting days. I was fired up.

But before I get to that, I need to introduce the newest member of my "toolbox":
Yes, a couple months ago I bought myself an extension table for my sewing machine. It makes a huge difference for larger projects and especially with free motion. I have been loving it!

I had one of the the three pieces* of my quilt marked for the large circles. I first sewed in the long direction, curving one way and then the next as I went down the quilt:
They're a little hard to see, but you should be able to make out
the hourglass shapes on the yellow squares.

Once that direction was done, I went across the short way:
Now all the curves "connect" and make the circles I was after. This quilting was done in red thread so that it would stand out a little more. I did all the stitching with my walking foot and it kept all the layers flat and where they should be.

Here's a wider view: (you may want to click to embiggen)
Once those curves were done, I turned my attention to the red squares. I switched to free motion and just outlined the main circle design in the square and then traced whatever shapes I wanted to inside the circle.

It was nearly impossible for me to get it on camera, but maybe you can get an idea from this:
Then I started to run into trouble. My upper thread kept splitting and after restarting a bunch of times, changing needles and cleaning the machine,  I decided it was time to bring it in for its overdue service and cleaning. So I brought it to the shop this afternoon and hope that they will fix what is wrong.

Meanwhile I was happy with what I got done. I also got a pretty good idea of how much time it's going to take. (Too long to get it done in "one big weekend" but not so big that a few good sessions won't get it taken care of.)

And now that my machine is in the "shop," I can turn my attention back to gift knitting. (I might give you a sneak peek later...)

__________________
*I have divided the quilt top into thirds and will be quilting it in pieces and then joining them together at the end, following methods of Marti Mitchell.

Thursday, November 25, 2010

Scarf of Options

I finished the Honey Cowl in good time. (It involved putting aside some holiday knitting and my grey tunic, but I am hoping to be able to make up time on those.)

The weight and texture of the cowl are very nice. It has enough stretch for something which needs to be pulled over your head. The width (about 7 inches on mine) gives you plenty of coverage around your neck without too much bulk.

I find the cowl very versatile.

The simplest way is to just hang it around your neck:
Project Stats
Started
: 19 Nov '10 Finished: 23 Nov '10
Pattern: Honey Cowl by Ann Maria for Madelinetosh
Materials: Madelinetosh Pashmina (1 skein)
Good for days when the wind's not too bitter. It could be worn outside the coat (as seen here) or easily tucked inside.

You could cover the back of your head and then pull an extra loop around your neck:
Handy if the temperature drops suddenly or you have to spend a longer time outside than expected.

But I have to say my favourite way is just a double loop around the neck:
It's still not so tight as to choke you, but gives a nice bulk and heft around the neck. Probably wouldn't work inside a coat, but worn on top of a collar it works nicely.

Any way you wear it, the right and wrong side of the fabric will show. Fortunately, the "back" looks just fine. (In the picture above, the bottom-most fold shows the right side, but the next one up reveals the wrong side. Looks fine to me.)

And let me say again, this colour is just gorgeous: "Baltic Blue." I'll drown in that any day.

Sunday, November 21, 2010

Showing Your Pattern Who's Boss

But before I get to the "bossy" part, let me tell you what I'm working on.

Amy, at Red Purl, asked me to knit a shop sample from the new line she's carrying: Madelinetosh. I have heard many a gushing comment on the web/Ravelry about 'Tosh so I said, why not? (I mean, I have all of 5 weeks until all my Christmas knitting has to be done, right? ::groan::)

The pattern, Honey Cowl, is designed for the Tosh DK, but Amy wanted it in the Pashmina. Fine with me, because in the Pashmina the lovely wool is blended with even lovelier cashmere and silk. (How decadent is that!)

Amy let me pick the colour; she had four. And, well, let's face it, there wasn't a bad one in the bunch. A gorgeous dark red ("Tart" I think), a goldish/redish mix "Amber trinket" (hard to describe but beautiful), a deep semi-solid blue "Baltic Blue" and a goldish colour.

Of course, she thought of me immediately when she saw the "Tart" (because of the colour, not the name!), and I did love it. But I decided on the blue. It's deep deep deep and you can get lost in it. I thought the slight variation in colour would work well with the slip stitch pattern. And after knitting a bunch up, I think I was right!
I cast on Friday night and put in some serious knitting time over the weekend. I'm at about 7 inches or so. The pattern says to go until it's 12 inches wide but Amy wants me to just knit as far as I can with one skein. We'll see how far I get.

Meanwhile, the yarn is just wonderful to work with and feels really nice. Not that super soft that makes you weak at the knees, but it feels like it will wear well and last over time.

Now, about that "bossing the pattern." Since that pattern is free and I've linked to it I don't think they'll mind if I describe the stitch pattern. Rows 1 and 3 are just plain knitting. Rows 2 and 4 alternate Purl 1 and slip one (with yarn in front).

Now purling is not so bad, but knitting is easier. And I remembered a technique I had read about once which would let me knit all the time. (I've since traced it back to a post in Fleegle's blog which I found through a link on the great TECHknitter's blog. Fleegle's blog is apparently also great but I haven't explored it much so I can't say that from personal experience.)

What is this great method?

Sorry, before we get there, let us first review a simple fact about knitting: The knit stitch and the purl stitch are the same but are reversed from front to back. In other words, a knit stitch is a purl stitch from the other side; and a purl stitch is a knit stitch from the other side. So when you are supposed to purl, if you could just work from the other side, you could knit and it would be the same thing.

Ok, now for the meat of it:

Row 1 you knit as directed. When you get to the end of the round, you are here:
The right side is facing you.
Normally you would pull the yarn in front and start purling. But what if you tried to just turn the work around and knit?

Then you are here:
The wrong side is facing you.
Now one option would be to start knitting "backwards" (from left to right) and that would get the job done. But it's slower, awkward and hard to get an even tension (for me anyway).

So what you do is work with a second yarn. See here I have the yarn I just finished knitting with on the left. And a new yarn attached on the right:
Now you can drop the first (left) yarn and just start working with the second yarn:
This has you going in the right direction and lets you "Knit 1 and slip one (with yarn in back)" instead of the "Purl 1 and slip one (with yarn in front)". When you get to the end of the round, turn your work, drop the working yarn and pick up the yarn you had dropped previously.

You go through the whole project alternating working yarns and changing directions. It works brilliantly. Since you're changing yarns every row, there's no line of carried yarn up the back and I think the "seam" is no more obvious than what it is in "regular" knitting in the round. (There's always some sort of jog in the pattern at the "end of round" changeover point.)

Why does it work?? Well knitting in the round is actually knitting in stacked "spirals." Usually all the spirals go in the same direction. (For a visual, Grumperina's diagram on this post might help.) But there's no reason you can't interlace two spirals going in different directions. That is what we're doing by turning the work over.

Simple. Ingenious. Not my idea. But I love it.

Thursday, November 11, 2010

Well into Glovember

Anyone see Edward Scissorshands?
I finally got started on my gloves for "Glovember" on Sunday. (A whole week late!) Ok, ok, I know "Glovember" is not nearly as good as "Socktober" (not nearly as popular either, strangely enough) but I'm sticking with it.

I know I suggested three glove patterns in this post that I was considering, but it turns out they didn't work out for the wool I wanted to use. Two of them, for one thing, were written for fingering weight instead of DK. How did I not notice this? (Personally, I think the way they were entered in Ravelry is to blame.)

If so inspired, I'm sure I could convert them to DK weight, but the one I liked best was 4 Euros, a little much for a pattern that might not work.

So I did an extensive search through Ravelry's database and found the Green Thumb pattern by Diana Foss. I thought it was perfect for the green wool I had in mind. In the picture below you can see it has a leaf pattern which replaces a thumb gusset. Clever, isn't it!
I can't imagine why some think gloves are fiddly!
The pattern is written for fingerless gloves (or "wristers") but that's what I definitely did not want. So I am converting the pattern to full-fingered gloves.

They have been flying off the needles and I'm having a lot of fun working on them.
Parlour tricks with needles.
I made a whole slew of gloves my first year of college and gave them to everyone in my dorm. (I should explain that I lived in a dorm that was more like a townhouse; so we're talking 7 pair of gloves here, not 30.) I forgot how much I liked making them.
I considered making a right and left glove, but decided the pattern had enough flexibility to it that I could just make two identical "ambidextrous" gloves and not have to worry about keeping them straight. So far that seems to be working out fine.

I've been hitting these gloves pretty hard this week, and although my tunic has suffered somewhat, it is still moving along at a pretty good pace. The back is approximately 7 inches and I'm well into the plain stocking stitch. All the "comfort knitting" I could ever want!

Sunday, November 7, 2010

A Little Fun with Fabric

It's getting to be that time. That time when those of us who craft realize that we really have to get going on holiday projects. (Now normally, I don't like to even talk about Christmas until advent begins, but when you have to make stuff, preparations must be made!)

This weekend my determination was strong enough that I got out my sewing machine, some fabrics and lots of thread and worked on my annual postcard quilt. I turn a picture of the postcard into my Christmas card. (My last two can be seen at this post.)

As usual, my head was swimming with ideas, but I settled on a thread painting technique. I pulled out two scraps of  black velvets to try. I pulled out a lot of threads
and off I went.

I'm not going to show you the one I settled on. (Sorry, you'll have to wait until they're sent out.) but I could be persuaded to show a sneak peak:

While I had everything out I experimented with a second card. I wasn't quite as happy with it, but still not too bad.

After doing some free motion waves with snowflakes, I couched some of my leftover mohair

and then added some sparkle.
(Why not?)

I think it's good enough to send out to someone...now just who will it be??

I just love doing free motion. I think every time I do it, I love it more. I still do better when I have a shape or line to follow, but it's fun either way.

I finished both cards with a satin stitch and then couched more mohair around the edge. It makes a nice subtle frame.

Thursday, November 4, 2010

More Comfort Knitting Needed

I've been feeling a little sick the last few days. And although I try hard not to whine, in my head there is a constant drone. And yesterday I realized that I needed some more comfort knitting.

The problem with my Truffle Tunic is that the colourwork has got me down. I like it, don't get me wrong. But I was just never picking it up. I know, in my head, that the "tricky" part of the long floats would be over quickly if I would just get to it.

But I'm not getting to it.


And now I'm sick[ish] and feeling sorry for myself and really wanting some more comfort knitting.

That's when I had the great idea. I could put the front with all its colourwork on a stitch holder and start on the back. The back is just miles and miles of plain knitting--just what I needed.

And that's exactly what I did.

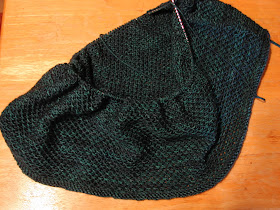
The stitches from the front are on a holder, and the whole thing is in a time out.

And now I am done the rows of 1x1 ribbing and started on the 3x3 ribbing. Five more inches of that to go.
That sad part of the story is that I forgot that the ribbing is done on smaller needles. So I could have actually started the back without worrying about the stitch holder. And it would have saved me one time of casting on and knitting 111 stitches and having to rip it all out. ::philosophical shrug:: That's alright, comfort knitting is so good I don't mind doing it twice.

And now I'm going to go do some more...(cough cough, sniff)