Saturday, February 26, 2011

I Fell in Love!

Cupid's arrow hit me hard this weekend. I went through the last knitty issue (which I somehow missed when it came out--that is still mystifying me) and found this latest design by Ann Weaver (designer extraordinaire):
It's called Oranje and you can find it here. Not only is it gorgeous, but it has this great story that Ann wrote for the pattern's introduction:
My fascination with Dutch athletic uniforms began after I watched the Dutch speed skaters in the 2010 Winter Olympics. Their graphic, aerodynamic suits inspired me to design a mitten pattern this spring called "Go Dutch!"
However, the fascination was intensified when the Netherlands’ national football (that’s “soccer” to the American readers), nicknamed the “Oranje,” made it to the World Cup finals this past summer. I had the good fortune of being in a tiny, old, wood-paneled pub in Rotterdam, watching the game projected onto a screen, when the team beat highly favored Brazil in the quarterfinal match. That day I decided to knit a tribute cardigan, and sketched up this design.
This cardigan is as bold as the “total football” of the Oranje, filled with graphic patterns that create both vertical and horizontal movement around the yoke. Surprising details like the striped hem facings, braids, and a row of tiny glass buttons make this piece one of a kind.
The Netherlands has always been a little confusing for outsiders because their flag is striped red, white and blue, but their national team uniforms are orange. (The brightest and purest orange you can imagine.) The fans wear orange and wave solid orange flags. It's simple of course: it's from the historical "House of Orange" of the royal family.

And if you want to see the skating uniforms that inspired Ann, click here.

Coming from Dutch stock myself and a long time cheer-er of Dutch skaters (as long as they're not beating Canadians, of course), I absolutely want to make this sweater.
I. Love. It.
(so much)

Plus it is full of little details like knit-in braids, that I don't know how to do and want to learn.

The original yarn it was done in is out of stock, but Ann has recommended Madelinetosh sock yarn as a good substitute.

Red Purl carries Madelinetosh. A little research is in order....

Friday, February 25, 2011

Travel Knitting Results (and not so much)

I believe I mentioned that I was bringing a new project for my travels over the weekend: my "cuffed boot socks."

I got quite a bit done on the trip down. There were minimal airline delays but still plenty of time for knitting with a connection to catch. And of course I had a head start because I couldn't put the project down before I left. (!!)

I got the legwarmer long enough that I felt I should start some 1x1 ribbing for the bottom portion. I think that will bring it in a little tighter around the ankle, and that it will just look better with a contrasting cuff.
I knit a few rows of 1x1 ribbing but soon realized that I needed to use smaller needles for the ribbing--it was just too loose and sloppy--but I didn't bring any with me! I realized I had to put the stitches onto a length of yarn and start the second legwarmer with the other end of the ball. (Because there's no way I'm going to cut it!!)

I cast on on Saturday morning while sitting around with my sisters and mom. I wondered about the wisdom of doing the Turkish cast on in the round while distracted (it's still a little "fiddly" for me), but it seemed to go ok.

I got pretty far on the second legwarmer between the visit and the return flight.
That is, until I pulled it out of my bag and had some of the stitches slip off the needles. No big deal...except that as I was putting it back together, I counted stitches to make sure I had the right number on each needle.

I was four stitches short.

I recounted many times (I was sitting in an airport, what else did I have to do but deny the obvious?) but kept coming up short.

So even though I mastered the Turkish cast on with familial distractions, I still can't count.

I've faced the fact that I have to completely ravel the second one, but I haven't done it yet. I don't have the strength right now. My only consolation is that it is going to be worth it. The first one feels great!

As for my trip, I was only too happy that I packed two projects. While I was packing, I threw in my Summit shawl--just in case. One project never seems like enough to me. I got quite a bit done on it, but I still don't think it's long enough...

Wednesday, February 23, 2011

Birthday Gift

So this little trip that I just took happened to closely coincide with my sister's birthday. The sister that I was visiting. So of course I had to bring her a gift.

What I came up with was to dress up my sample square from the Kaffe Quilt as a pot holder for her. She was with me when I picked out the fabric, and her kitchen is bright yellow with an attached orange living room. I thought the red and yellow might fit!

I started with the stitched square:
and just added purchased red binding around the outside. I don't have the pictures to prove it but my mitered corners came out quite nicely, thank you. I did it in my usual way: sew the binding on by machine one side at a time. I end and restart the sewing at each corner, folding the binding for the miter. (The very bottom of this page has directions if you want to see for yourself. Except I don't stop 1/4" from the edge--I pivot at that point and sew at a 45 degree angle to the corner. Works like a charm.)

The other tricky thing with potholder binding is that you have to make a loop for hanging. Why? Well, you just do. All potholders need a loop to hang, even if you keep them in a drawer. I tried a new method that I may have made up and I have to say that it is the best looking loop I've ever seen. No bragging there, just a fact. (Or maybe I don't get out much.)
Back side

Front side

Now tell me that doesn't look good!

I do not have a step-by-step for you, but if you'd like to try it yourself, you may be able to figure it out from this photograph:
Now of course, it won't make any sense unless you have your own piece in front of you and can manipulate the binding until it looks like the above picture. If you have questions while you're doing it, email me and maybe I can help.

And with a little time the night before I left, I finished the hand sewing on the binding and had it ready to go:
She had a perfect little spot for it on the wall where something else had recently come down. See? I told you it needed a hanger!

Tuesday, February 22, 2011

A Hat for Skating

Skating? Check. Whistler sweater? Check. Matching hat? Check!
Here are my hat and I enjoying the Rideau Canal.

After a mid-week warm up scare, the temperature conveniently dropped about 20 degrees on Friday night so I could go skating with my sister, BIL, niece and nephew. I think we all had a wonderful time. I certainly did!
The sweater and hat are quite matchy matchy but notice how the cowl breaks it up. I'm kidding. Despite how the reds completely clash, and that I could risk taking off the coat for a couple pictures, there was no way I was taking off that cowl. It was cold! (But I loved it.)

Back to the hat, I went so far as to make the tassels called for in the pattern:
I just pinned them on, however, so I can remove them whenever I want. I think they're a little dorky but they're traditional to the style. I have a hard time fighting that.

The hat came out a little long. If I made it again, I'd consider skipping the first band of black with gold "arrows." As it was, I had to skip the last little bit of colourwork which was some natural dots and then some red dots. In this way, Project Stats
Started
: 19 Jan '11
Finished: 28 Jan '11
Pattern: Whistler 2005 by
Dale of Norway
Materials: Leftovers of Dalegarn Falk in Grey, Goldenrod, Barn Red, Natural
I started the shaping at the right measurement, but I still think the hat is a little long. I generally prefer them fitted and not standing up on top of my head. But like the tassels, I think this shape is traditional to the style, so I'm not fighting it either.

The day before skating, my sister and I walked [quite a ways] to the movie store and it was much windier. The wind was cutting right through the hat, which strengthened my idea to line it. I originally thought to do it because I have some nice yellow/gold alpaca lying around waiting to be used and a lining would hide and protect all the long strands inside the hat from the colourwork. Another part of me asks, "Just how often do you need a hat to protect you from strong frigid winds?" I don't know. I'm still not sure if I will do it, but if I do you know I'll let you know!

One more superfluous shot:
I love the Rideau Canal. And hot chocolate at Tim's afterwards was perfect too, even if they were out of Boston Cremes.

Thursday, February 17, 2011

Another Travel Project

I'm headed on a trip and all of my current projects are too big to bring along. So what am I to do? I really don't need to type it in black and white, do I? But I will...start another one!

I've had in mind to make myself a pair of "footless socks" to wear under pants for warmth, or peaking over the top of my boots for fashion. (I got that one from my friend, Wendy; she really knows how to rock the look.)

When I was spending my Christmas Red Purl certificate (thank you, Boss), I added some of Sandy's homespun wool to the pile. It's a beautiful golden wheat colour. Quite varied with still a consistent over all look. I had admired it a number of times and finally decided I could take it home. After I got it home, I realized it was perfect for this idea.

I did some a swatch in the 2x2 ribbing I was planning to use.
30 stitches = 3" unstretched
and 6+ inches stretched.

I threw those numbers in a blender with the measurements of my ankle and calf and cast on 72 stitches. It seems to be working. I'm working top down, and if I think it needs to narrow I can always decrease some stitches on the way down. But first I need to get through what I want to be a very deep cuff.

Even though I cast it on to have it going for the trip, I haven't been able to stop picking it up. I've got over 4 inches done already. Do I need to say again how much I love working with wool!? This stuff is hairy in a good way--I'm not sure exactly what that means because before this wool I wouldn't have thought that was possible.

Maybe when this project's done, I'll tackle something else that's been rattling around in my mind: knit-covered boots, like these by D&G:

Tuesday, February 15, 2011

Mitigated Disaster

I don't think I've mentioned here that I am working on a hat. I want something to match my Green Thumb gloves.

Obviously it has to have a leaf motif. And I thought I had enough wool for a tam (or beret). All my hats are fitted, and I wanted something slouchier. (I'm already optimistically thinking of something I can wear into spring.)

I looked and looked for a pattern, but finally accepted that I would have to make something up.

I started with this pattern, Falling Leaves Hat by Shannon Russo:
(Picture from Shannon's blog.)
You can see that the leaves are there, but the pattern definitely needed some tweaking for what I wanted. I got some help from another blogger. Kirsten Kapur (through the loops) has posted a recipe for a "one day beret." The one day part might be a little optimistic, but it was a great guide for my tam shaping.

I started at the top with a short I-cord:
Then continued with Shannon's pattern, more or less.
I spaced the leaves out to give some room between them. And of course, I made sure to keep increasing the number of stitches so the shaping would follow a tam shape. I had to really fudge on Kirsten's "recipe," but it was working out.

I made it a couple inches shorter than Kirsten recommended before starting the decreases (it's a "knitter's choice" phase of the recipe) but I still ran out of wool way before it was done.
I was working furiously on this last week because I thought I might just get it done in time to wear on the weekend when I went skating with my sister and niece. But at some point I realized I was definitely going to run out of wool and then decided the easiest way to find out just how much I was short was to knit to the end of the ball. Which is what I did.

And then I put it down.

At some point when I feel like concentrating, I'll look at how much knitting I got out of the ball, how much I need to make this a wearable hat and try to concoct something that will make #2 possible from #1.
The big question will be: how far back do I rip out? I think I only have to go about half way back to correct the shaping, but I don't really like the wide stems at the top. I may insist that I rip out almost to the beginning so I can correct that too.

Because what would be the point of correcting the hat shaping only to not like the design every time you put it on your head? But until I have the energy for that, the hat can stay on the plate.

Sunday, February 6, 2011

Super Sunday (After a Super Saturday)

In case you live in another country (or under a rock), today is the Superbowl. My Colts aren't in it, but it'll still be fun to see the Packers and Steelers fight it out.

Next year the Superbowl will be in Indianapolis for the first time. (They basically built the new Lucas Oil stadium to get the Superbowl and apparently it worked.) The organizers are letting people who don't live in the area get involved by making scarves they're going to give to all the volunteers. They need 8,000 of them. (I wonder if they heard what happened when the Special Olympics asked for scarves, but that's not my problem...)

They specified very specific colours for the scarves in several brands. I've opted for a special blend made by the Indiana company Alpaca with a Twist in Touchdown White and Touchdown Blue.
Although team logos are not allowed, apparently they had no problem picking the blue and white of the Colts. ;-)

Yesterday the yarn shop, Yarn Gourmet, had a Super scarf knit in/potluck for everyone in the area who is making scarves. Yarn Gourmet is carrying the Cascade brand approved colours. I had a fun time and stayed for knitting, eating and shopping for a couple hours! (I bought some nice Mini Mochi but I'll show you those some time later.)

I've decided to double knit my scarf, spelling out SUPER down one side and BOWL XVLI down the other. Double knit means it'll be two sided, blue background on one side and white on the other.
I finished the R while I was there:
Since white stitches on one side are blue stitches on the other, the letters will be backwards on the back.
I've decided I can live with that. (Lots of scarves have a "right" side and a "wrong" side.)

Here's an extra shot:
See how the blue stitches on the needles proceed from columns of stitches on the scarf? And the white stitches come from nowhere. Well, not really of course--those stitches are from columns of stitches on the reverse side. It's a intriguing spatial puzzle while you're knitting. You have to think in pairs, one stitch from the front, one from the back. And each time you need to change the colour to make a letter, you have to do it on both sides. I find it fun.

I just hope I don't run out of yarn...(Just started and I'm already worried about it!)

Friday, February 4, 2011

A Cowling Good Time

We had us some fun tonight at Red Purl. Lots of laughter, good times, and dog farts. (Purl was not having a good night.)
In all, 18 people came with cowls to exchange. You can see them piled up in the middle of the table (in bags).
It was a full house!! When we thought everyone had come who would come, we started the "official" games. Amy had anointed me Mistress of Ceremonies and I took it very seriously. (Naturally.)

First I rounded us up in a circle around the table (we had to stand, there were so many of us). Then we went around saying our names. Then we each had to try to say them all. Do well: get a number from the top of the pile (#1, 2, 3, etc). Do poorly and get a number from the bottom of the pile. (That would be me: #18.) Not that it mattered much, but we all liked to be ranked don't we?

Then we went in order by that number to pick out the bag you wanted from the pile. Not that it mattered much because I was just getting started...

There was one lone knitter who was not participating (but having lots of fun laughing along) and I asked her to read a left/right story that I had printed and revised (slightly) from the internet. Every time the word RIGHT is read, you pass right; and left for the word LEFT. This simple task never fails to get people laughing.

Once that was done, I checked if anyone had her own bag: only one did. So she got to pick a number out of a hat, and had to switch with the person with that bag number. Done.

Now we opened bags in order, not that it mattered much, but it was a way to know what to do next. Each was opened, exclaimed over, tried on, and declared "mine" by the recipient.

It was amazing how all the cowls were lovely and each elicited "ooohs" and "aahs" from the rest of us. They also matched what just about everyone was wearing. That was a little weird.

What did I get?
A medium length cowl made from Rowan big wool (I'm pretty sure), maybe 042 mulberry. It's a nice mauve. Not a colour I wear at all, actually, but it perfectly complemented the pink outfit I had on today. So I guess I do wear that colour family, at least. It won't go with my regular red coat, but I think it will be smashing with a long camel-coloured coat I have. Lovely!! (And I'd tell you who made it, but of course, I've forgotten her name because I am that bad with names.)

And what did I make?
It's a pattern called Pletenka by Lilia Mankki. It was received by Rose who took my heel-sock class and is also heavily renovating her house. We trade horror stories and status reports whenever we see each other. (She has one small room--the porch--that is completely done, so she is ahead of me! I am not jealous; I am happy for her.) We were encouraged to include treats with the cowl, and I added a bag of Skittles. (Get it? "Taste the Rainbow.")

When I realized that I had a rainbow of Malabrigo, I searched out a pattern to take advantage of it. This one seemed to fit the bill perfectly. It's a little awkward at times (understatement) but goes very quickly and really isn't hard.

The only change I made to the pattern was to start with three knit rows instead of jumping right into the pattern. It ended with three knit rows and I wanted the symmetry. This caused it to curl nicely on both edges. (Oh, and I did increase to 84 stitches for an adult size, as suggested by the designer.)

The pattern took approximately 15 yards of each colour. I was able to used scraps for all but the red and yellow. I had run out of those and just went ahead and bought full skeins so I could make this project. (Troy told me to! I believe his arguments was, "Really, it's not like buying Malabrigo would ever go to waste." I had no counter-argument to that and trotted off to Red Purl as soon as I could.)

The colours I used were: Ravelry Red, Glazed Carrot, Sauterne, Lettuce, Blue Surf, Hollyhock and Red Mahogany. Roy G Biv. All the scraps were from my knit-along afghan of 2009.

Project start: Jan 10 '11
Project finish: Jan 16 '11

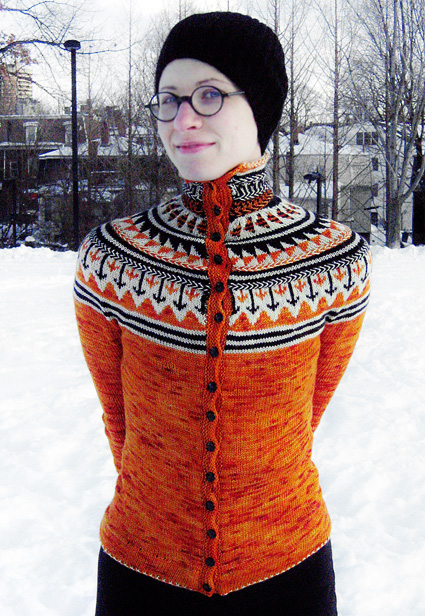
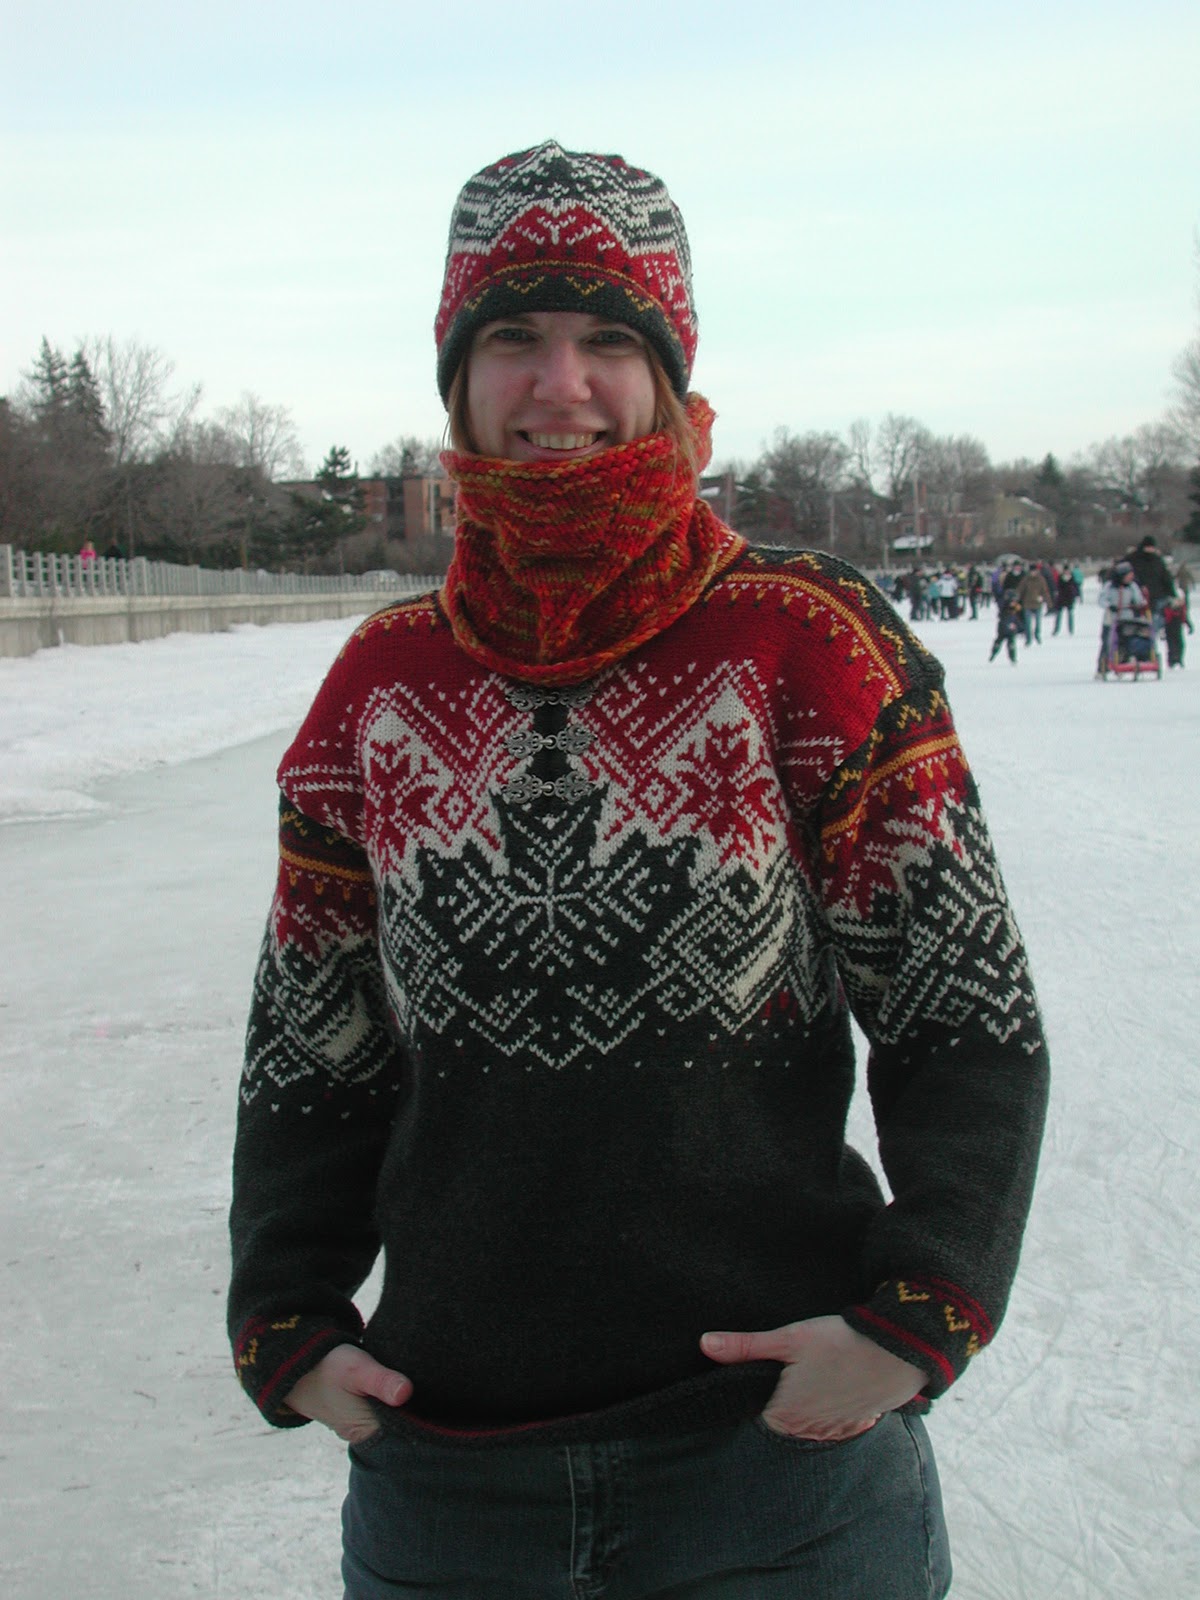
I think I want one for myself now. Maybe with a matching hat.

May I suggest?

I Say! or at least I did once...